Are you tired of accidentally moving your cursor while typing on your Chromebook? Frustrated with unintentional clicks that disrupt your workflow? Look no further! In this comprehensive guide, we will explore the step-by-step process to disable the touchpad on your Chromebook, ensuring a smoother and more efficient user experience.
Chromebooks have become increasingly popular due to their portability and user-friendly interface. However, the touchpad can sometimes be more of a hindrance than a help. Whether you prefer using an external mouse or simply want to eliminate accidental touches, disabling the touchpad can be a game-changer. By following our expert advice, you’ll regain full control over your Chromebook’s navigation, allowing you to focus on your tasks without any distractions. So, let’s dive right in and discover the various methods to disable the touchpad on your Chromebook!
How to Disable Touchpad on Chromebook:
- Click on the clock in the bottom-right corner of the screen.
- Select the gear icon to open the Settings menu.
- Scroll down and click on “Advanced” at the bottom.
- In the “Accessibility” section, click on “Manage accessibility features”.
- Under “Mouse and touchpad”, toggle off the “Enable tap-to-click” option.
Introduction
In this informative article, we will guide you through the step-by-step process of disabling the touchpad on your Chromebook. Whether you find the touchpad to be too sensitive or you prefer using an external mouse, disabling the touchpad can improve your overall user experience. We will provide detailed instructions and explain the necessary settings to help you easily disable the touchpad on your Chromebook.
Step 1: Accessing the Settings Menu
To begin the process, you need to access the Settings menu on your Chromebook. The Settings menu contains various options to customize your device’s functionality. Here’s how you can access it:
1. Locate the time and date display at the bottom right corner of your screen.
2. Click on the time and date display to open the Quick Settings menu.
3. In the Quick Settings menu, click on the gear icon labeled “Settings.” This will open the full Settings menu in a new tab.
4. Alternatively, you can also access the Settings menu by clicking on the launcher icon (typically located at the bottom left corner of your screen) and searching for “Settings” in the search bar.
Step 2: Navigating to the Touchpad Settings
Once you have accessed the Settings menu, you need to navigate to the Touchpad settings to disable it. Follow these steps:
1. In the Settings menu, locate and click on the “Devices” option. This will open a submenu with various device-related settings.
2. From the submenu, click on “Touchpad” to access the Touchpad settings.
3. In the Touchpad settings, you will find options to customize the touchpad’s behavior and sensitivity.
4. Locate the toggle switch labeled “Enable Touchpad” or a similar option. This switch controls the touchpad’s functionality.
5. To disable the touchpad, simply slide the toggle switch to the “Off” position. The touchpad will now be disabled, and you can use an external mouse or other input devices instead.
Step 3: Verifying the Touchpad Status
After disabling the touchpad, it’s important to verify its status to ensure the changes have been applied successfully. Here’s how you can do it:
1. Close the Settings menu tab to return to your main screen.
2. Test the touchpad by moving your finger across it. The cursor should not respond to your touch.
3. Connect an external mouse to your Chromebook and ensure it is functioning properly. Use the mouse to navigate and interact with your device.
4. If the touchpad is still active or you encounter any issues, repeat the previous steps to access the Touchpad settings and ensure it is disabled.
Step 4: Re-enabling the Touchpad (Optional)
If you ever decide to re-enable the touchpad on your Chromebook, you can easily do so by following these steps:
1. Access the Settings menu as described in Step 1.
2. Navigate to the Touchpad settings as described in Step 2.
3. Locate the toggle switch labeled “Enable Touchpad” or a similar option.
4. Slide the toggle switch to the “On” position to enable the touchpad once again.
5. Test the touchpad to ensure it is functioning properly.
By following these simple steps, you can easily disable the touchpad on your Chromebook and improve your user experience. Whether you prefer using an external mouse or need to temporarily disable the touchpad for specific tasks, these instructions will help you achieve your desired settings.
Frequently Asked Questions
Here are some commonly asked questions about how to disable the touchpad on a Chromebook:
Q: How do I disable the touchpad on my Chromebook?
To disable the touchpad on your Chromebook, you can follow these steps:
1. Click on the status area in the bottom-right corner of the screen.
2. Click on the gear icon to open the Settings menu.
3. Scroll down and click on “Advanced” to expand the advanced settings.
4. Under the “Device” section, click on “Touchpad settings”.
5. Toggle the switch next to “Enable tap-to-click” to the off position.
6. Close the settings window to save the changes.
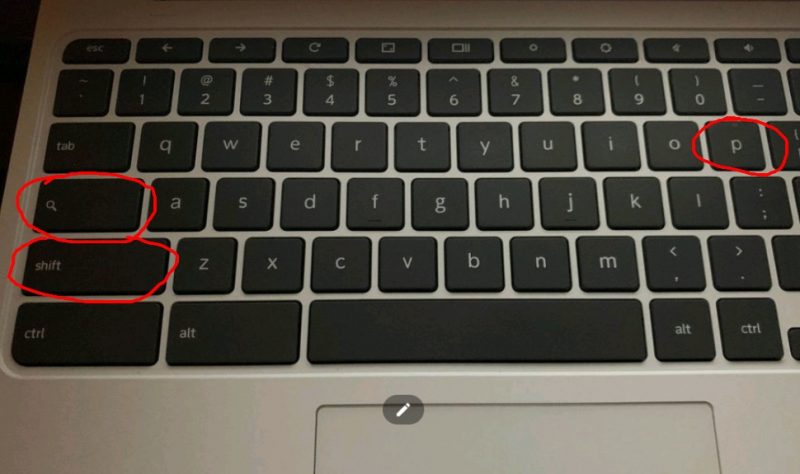
Q: Can I use a keyboard shortcut to disable the touchpad?
Yes, you can use a keyboard shortcut to disable the touchpad on your Chromebook. Pressing the “Search” key (which looks like a magnifying glass or a circle with a dot in the center) and the “P” key at the same time will disable the touchpad. To enable it again, simply press the same combination of keys.
Q: Is there a way to disable the touchpad temporarily?
Yes, you can temporarily disable the touchpad on your Chromebook by using the keyboard shortcut mentioned above. This will turn off the touchpad until you enable it again using the same shortcut. It’s a convenient way to disable the touchpad when you’re using an external mouse or when you don’t want any accidental clicks while typing.
Q: Will disabling the touchpad affect the external mouse functionality?
No, disabling the touchpad on your Chromebook will not affect the functionality of an external mouse. You can still use the external mouse as usual, and it will override the touchpad input. This allows you to use the external mouse without any interference from the touchpad.
Q: How can I re-enable the touchpad if I accidentally disable it?
If you accidentally disable the touchpad on your Chromebook and want to re-enable it, you can follow the same steps mentioned in the first question. Simply go to the Settings menu, navigate to the “Touchpad settings” section, and toggle the switch next to “Enable tap-to-click” to the on position. The touchpad will be enabled again, and you can use it as before.
In conclusion, disabling the touchpad on your Chromebook can greatly enhance your user experience and productivity. By following the simple steps outlined in this guide, you can easily navigate through your tasks without the frustration of accidental touches or cursor movements. Whether you prefer using a mouse or simply want to disable the touchpad temporarily, the option to customize this feature on your Chromebook is readily available. With this newfound control at your fingertips, you can enjoy a seamless and efficient workflow, ultimately allowing you to focus on what matters most: your work, studies, or leisure activities.
Remember, each Chromebook model may have slightly different settings or options for disabling the touchpad. It’s always a good idea to consult your device’s user manual or the official support website for specific instructions. So, take a moment to explore the possibilities and tailor your Chromebook to suit your preferences. With a disabled touchpad, you can unlock a whole new level of convenience and precision, making your Chromebook experience even more enjoyable and productive.

