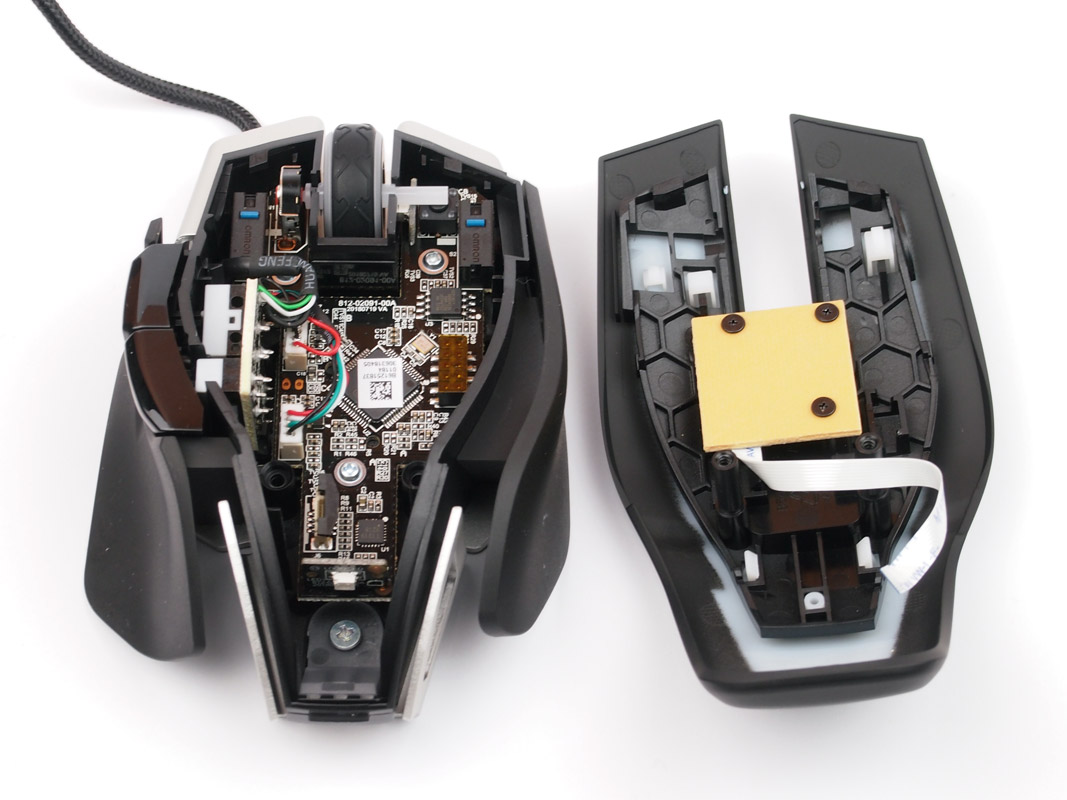
Are you eager to learn how to take apart your Corsair M65 mouse? Look no further! In this guide, we’ll walk you through the process of disassembling your Corsair M65 step by step. Whether you’re looking to clean your mouse or make repairs, we’ve got you covered!
Taking apart your Corsair M65 mouse may seem daunting at first, but don’t worry, it’s easier than you think. By following our instructions, you’ll be able to navigate the disassembly process with confidence and precision. Get ready to unleash your inner tech enthusiast!
So, grab your tools, put on your DIY cap, and let’s dive into the world of Corsair M65 disassembly. Get ready to discover the inner workings of your mouse and gain the knowledge to personalize and maintain it like a pro! Let’s get started!
- Unplug the mouse from your computer.
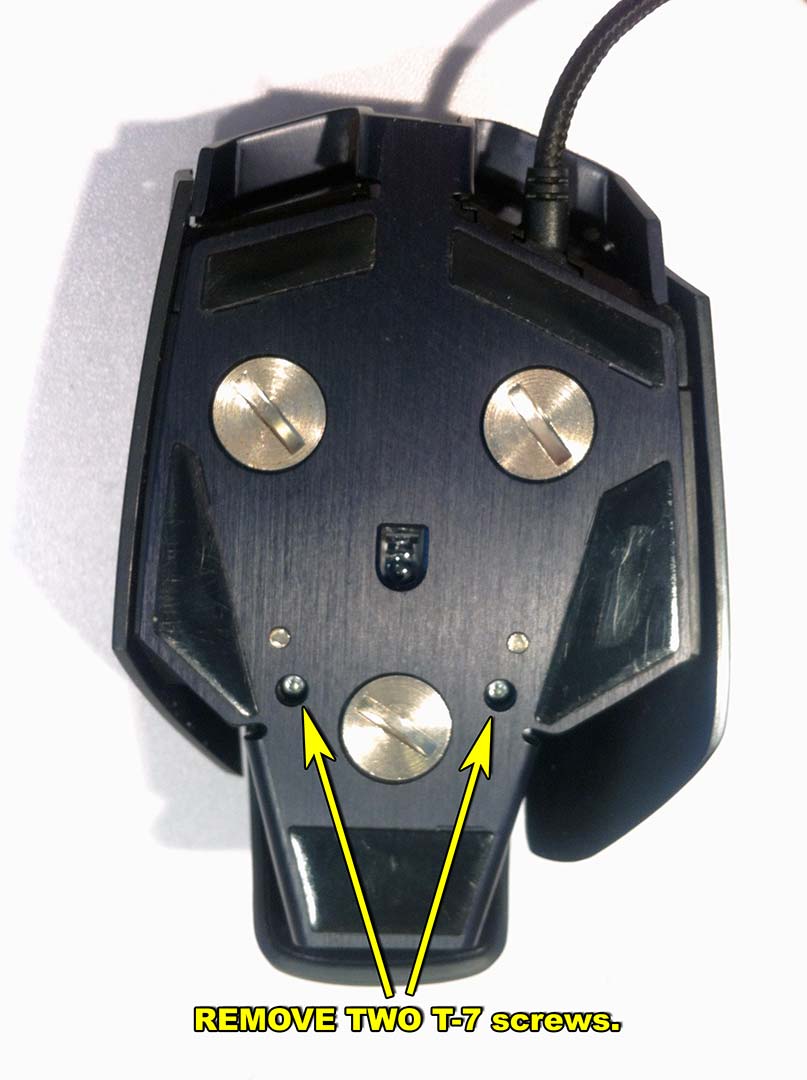
- Remove the screws on the bottom of the mouse.
- Gently separate the top and bottom halves of the mouse.
- Disconnect any cables or connectors inside.
- You can now access the internal components of the mouse.
Remember to proceed with caution and take your time. Happy disassembling!

Corsair M65 Disassembly: A Detailed Guide to Taking Apart Your Gaming Mouse
When it comes to gaming peripherals, the Corsair M65 is an incredibly popular choice among gamers. Its ergonomic design, customizable buttons, and high-precision tracking make it a favorite for competitive play. However, like any electronic device, there may come a time when you need to disassemble your Corsair M65 either to clean it thoroughly or fix a specific issue. In this article, we will provide you with a step-by-step guide on how to disassemble your Corsair M65 gaming mouse safely and effectively.
Tools You’ll Need for Disassembling Your Corsair M65
Before we dive into the disassembly process, let’s first gather the necessary tools. Here are the tools you’ll need to successfully disassemble your Corsair M65:
- Small Phillips-head screwdriver
- Tweezers
- Plastic spudger or guitar pick
- Isopropyl alcohol
- Cotton swabs
Step 1: Preparation and Safety Measures
Before you start disassembling your Corsair M65 mouse, it’s essential to take some safety precautions. Make sure you unplug the mouse from your computer and remove the batteries if applicable. This will prevent any accidental electrical shocks or damage to your computer.
Next, find a clean and well-lit workspace where you can comfortably work on your mouse. Using an anti-static mat or wrist strap is also recommended to prevent any static electricity from damaging the sensitive components of the mouse.
Now that you’re ready, let’s move on to the disassembly process.
Step 2: Removing the Mouse Feet
The first step in disassembling your Corsair M65 is to remove the mouse feet. These are the smooth pads located at the bottom of the mouse that allow it to glide smoothly on a mousepad or desk surface. To remove the mouse feet, follow these steps:
- Use the plastic spudger or guitar pick to carefully lift the edges of the mouse feet.
- Gently peel off the mouse feet, being careful not to tear them.
- Keep the removed mouse feet in a safe place to reattach later.
By removing the mouse feet, you’ll gain access to the screws holding the mouse together.
Step 3: Removing the Screws
With the mouse feet removed, it’s time to remove the screws that hold the mouse’s top cover and bottom plate together. Use the small Phillips-head screwdriver to unscrew the following screws:
- Four screws located under the mouse feet. These are usually found near the four corners of the mouse’s base.
- Two additional screws, typically located under stickers or labels on the mouse’s bottom plate.
Keep the screws in a safe place as you’ll need them later for reassembly.
Step 4: Separating the Mouse Components
Once you’ve removed all the screws, gently separate the top cover from the bottom plate. Start by inserting the plastic spudger or guitar pick between the two halves of the mouse, and carefully pry them apart. Be mindful of any ribbon cables or connectors that may still be attached. If there are any, use the tweezers to gently disconnect them.
Once you’ve successfully separated the top cover and bottom plate, you’ll have access to the internal components of the mouse, such as the circuit board, switches, and scroll wheel. This is where you can clean or fix any specific issues you may be experiencing.
Step 5: Cleaning and Maintenance
Now that you have access to the internal components, it’s a good opportunity to clean and maintain your Corsair M65. Use isopropyl alcohol and cotton swabs to gently clean the circuit board, switches, and scroll wheel. Be cautious not to saturate the components with alcohol, as it can cause damage.
You can also check for any loose connections or signs of wear and tear while cleaning. If you notice any damaged components, it may be time to replace them.
Step 6: Reassembling Your Corsair M65
Once you’ve cleaned and addressed any issues, it’s time to reassemble your Corsair M65. Follow these steps to put everything back together:
- Reconnect any ribbon cables or connectors that were disconnected during the disassembly process.
- Carefully align the top cover with the bottom plate and press them together until they snap into place.
- Reattach the screws in their respective locations, including the ones under the mouse feet.
- Finally, carefully place the mouse feet back in their original positions, applying gentle pressure to ensure they adhere properly.
Once you’ve completed these steps, your Corsair M65 should be fully reassembled and ready to use.
Troubleshooting Tips and Final Thoughts
Disassembling your Corsair M65 can be a useful way to clean and maintain your gaming mouse or address specific issues you may be encountering. However, it’s important to note that disassembling your mouse may void any warranty you have, so proceed with caution.
Always exercise care when handling the delicate components of your mouse, and if you’re unsure about any step, consult the manufacturer’s documentation or reach out to their support team for guidance.
By following this guide and taking your time, you can safely disassemble your Corsair M65 and keep it in optimal condition for an enhanced gaming experience.
Key Takeaways: Corsair M65 Disassembly
- The Corsair M65 mouse can be disassembled for cleaning and maintenance.
- Start by unplugging the mouse from your computer.
- Remove the top panel by unscrewing the screws underneath the mouse.
- Gently lift the top panel to reveal the internal components.
- Clean the components using compressed air and a soft cloth.
Frequently Asked Questions
Welcome to our FAQ section about disassembling the Corsair M65 mouse. Here, we’ll answer some common questions to help you navigate the process smoothly.
1. How do I disassemble the Corsair M65 mouse?
To disassemble the Corsair M65 mouse, you’ll need a few tools, such as a screwdriver and a plastic pry tool. First, make sure to unplug the mouse from your computer. Then, gently remove the screws on the bottom of the mouse. Once the screws are removed, carefully separate the top and bottom shell using the pry tool. Be cautious not to damage any internal components. Finally, you can access the internals of the mouse for cleaning or modifications.
Keep in mind that disassembling your mouse may void the warranty, so proceed with caution. If you’re unsure or uncomfortable with the process, it’s best to seek assistance from a professional or contact the manufacturer for guidance.
2. Is it safe to disassemble the Corsair M65 mouse on my own?
Disassembling the Corsair M65 mouse yourself can be safe if you follow proper precautions and have the necessary tools. However, it’s important to note that any modifications or disassembly done on your own may void the warranty. Additionally, if you’re not experienced in working with electronics, there is a risk of damaging the mouse or its components during the disassembly process.
If you’re uncertain about your skills or uncomfortable taking apart your mouse, it’s recommended to seek assistance from a professional or contact the manufacturer for support. They can provide guidance and ensure your mouse remains in good condition.
3. Can I clean the Corsair M65 mouse without disassembling it?
Yes, you can clean the Corsair M65 mouse without disassembling it. Start by turning off your computer and unplugging the mouse. Use a microfiber cloth or cotton swabs slightly dampened with isopropyl alcohol to clean the surface of the mouse and remove any debris or dirt. Pay attention to the crevices and buttons where dirt may accumulate. Additionally, you can use compressed air to blow away any dust from hard-to-reach areas.
Regularly cleaning your mouse can help maintain its performance and prolong its lifespan. However, if you notice any issues or feel the need for a more thorough cleaning, disassembly may be necessary.
4. Can I replace the buttons or scroll wheel on the Corsair M65 mouse?
Yes, it is possible to replace the buttons or scroll wheel on the Corsair M65 mouse. If you have the necessary replacement parts, you can follow the disassembly process mentioned earlier to access the internal components of the mouse. From there, you can remove and replace the buttons or scroll wheel as needed.
However, be aware that replacing components may require some technical knowledge and skills. If you’re unsure or uncomfortable with the process, it’s recommended to seek assistance from a professional or contact the manufacturer for support.
5. Will disassembling the Corsair M65 mouse affect its performance in any way?
Disassembling the Corsair M65 mouse itself should not affect its performance as long as it is done correctly and the components are handled properly. However, if any components are damaged or not reassembled correctly, it could impact the mouse’s performance. It’s crucial to be careful during the disassembly process and ensure everything is reassembled correctly to maintain optimal performance.
If you’re unsure about any steps or encounter issues during disassembly, it’s best to seek assistance from a professional or contact the manufacturer for guidance to avoid any potential problems.

CORSAIR GAMMING MOUSE M65 RGB ELITE . Teardown/Disassembly & Reassemble
Summary
So, just to wrap things up, disassembling the Corsair M65 mouse isn’t as difficult as it may seem. With a few simple steps, you can access the internals and clean or repair it if needed. Remember to be gentle and take your time to avoid any accidental damage.
Overall, it’s a great learning experience that can help you understand how your mouse works and give you a sense of accomplishment. Happy disassembling!

