Are you tired of scrolling up when you meant to scroll down? Do you find yourself constantly battling with your mouse’s scrolling direction? Well, fear not, because in this guide, we will delve into the nitty-gritty of changing your mouse scrolling direction to suit your preferences. Whether you’re a tech-savvy individual or a complete beginner, this step-by-step tutorial will have you scrolling effortlessly in no time. So, grab your mouse, buckle up, and get ready to take control of your scrolling experience like never before!
In our digital age, the mouse has become an essential tool for navigating our computers and the vast online world. However, it is not uncommon to find oneself frustrated by the default scrolling direction. Fortunately, there are simple solutions that can revolutionize your scrolling experience. In this comprehensive guide, we will explore various methods for changing the scrolling direction of your mouse, ensuring that you can effortlessly maneuver through web pages, documents, and applications with ease. Whether you’re looking to switch from traditional scrolling to natural scrolling or simply want to customize the scrolling direction to your liking, we’ve got you covered. So, let’s dive in and unlock the secrets to a more intuitive and personalized scrolling experience!
How to Change Mouse Scrolling Direction:
- Open the Control Panel on your computer.
- Select “Mouse” from the available options.
- In the Mouse Properties window, go to the “Wheel” tab.
- Under “Vertical Scrolling,” choose the desired scrolling direction.
- Click “Apply” and then “OK” to save the changes.
Introduction
In this article, we will guide you step by step on how to change the mouse scrolling direction. The scrolling direction of your mouse can greatly impact your user experience, and it’s important to be able to customize it to your preference. Whether you are using a Windows PC or a Mac, we will provide instructions for both platforms. So let’s get started and learn how to change the mouse scrolling direction!
Changing Mouse Scrolling Direction on Windows
If you are using a Windows PC, follow these steps to change the mouse scrolling direction:
1. Open the Settings app by clicking on the Start menu and selecting the “Settings” icon.
2. In the Settings window, click on “Devices.”
3. On the left sidebar, click on “Mouse,” and then click on “Additional mouse options” on the right side of the window.
4. In the Mouse Properties window, go to the “Wheel” tab.
5. Under the “Vertical Scrolling” section, you will find the option to change the scrolling direction. Check or uncheck the box next to “Invert scrolling direction” to toggle the scrolling direction.
6. Click “Apply” and then “OK” to save the changes.
By following these steps, you can easily change the mouse scrolling direction on your Windows PC.
Changing Mouse Scrolling Direction on Mac
If you are using a Mac, the process of changing the mouse scrolling direction is slightly different. Here’s how you can do it:
1. Click on the Apple menu in the top-left corner of your screen and select “System Preferences.”
2. In the System Preferences window, click on “Mouse.”
3. In the Mouse settings, go to the “Scroll & Zoom” tab.
4. You will see the option to change the scrolling direction. Check or uncheck the box next to “Scroll direction: natural” to toggle the scrolling direction.
5. Close the System Preferences window to save the changes.
Now you know how to change the mouse scrolling direction on your Mac. It’s as simple as that!
Additional Tips
Here are a few additional tips to keep in mind when changing the mouse scrolling direction:
– Experiment with the scrolling direction to see which one feels more natural and comfortable for you.
– Some mouse models may have additional software or drivers that allow further customization of scrolling behavior. Check the manufacturer’s website for any specific instructions or software related to your mouse.
– If you are using a laptop with a touchpad, changing the scrolling direction may be located in the touchpad settings rather than the mouse settings.
By following these tips, you can fine-tune your scrolling experience according to your preference and improve your overall productivity.
Conclusion
In conclusion, changing the mouse scrolling direction is a simple process that can greatly enhance your user experience. Whether you are using a Windows PC or a Mac, you can easily customize the scrolling direction to suit your preference. By following the step-by-step instructions provided in this article, you can quickly and effortlessly change the mouse scrolling direction. So go ahead and give it a try, and enjoy a more personalized scrolling experience on your computer!
Frequently Asked Questions
Here are some commonly asked questions about how to change mouse scrolling direction:
Question 1: How can I change the scrolling direction of my mouse?
Answer: To change the scrolling direction of your mouse, you can follow these steps:
1. Go to the “Settings” or “Control Panel” on your computer.
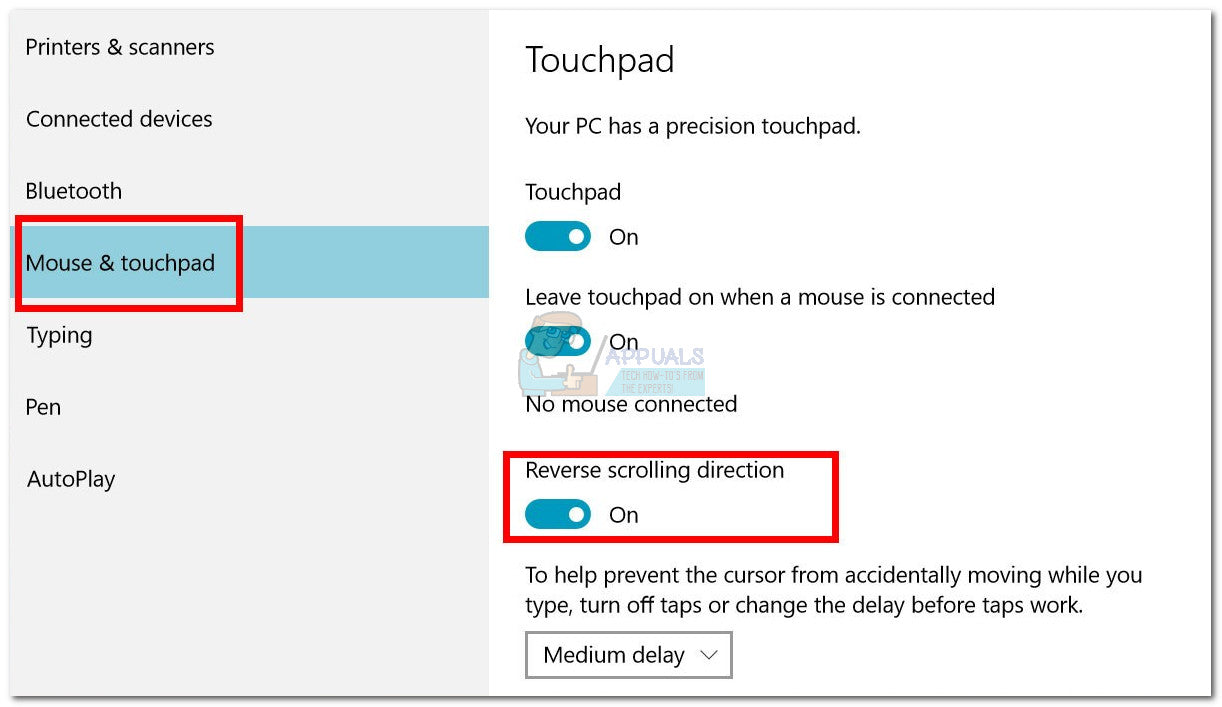
2. Look for the “Mouse” or “Mouse and Touchpad” option and click on it.
3. In the settings window, find the “Scrolling” or “Scroll” tab.
4. Here, you should see an option to change the scrolling direction. It may be labeled as “Scrolling direction” or “Reverse scrolling”.
5. Simply toggle the switch or check the box to enable the reverse scrolling direction.
6. Click “Apply” or “OK” to save the changes.
Your mouse scrolling direction should now be changed according to your preference.
Question 2: Why would I want to change the scrolling direction of my mouse?
Answer: Changing the scrolling direction of your mouse can be a personal preference or convenience. Some people find it more intuitive to scroll up to move the page up and scroll down to move the page down, while others prefer the opposite.
By changing the scrolling direction, you can customize your mouse to suit your own preference and make scrolling through documents, webpages, and other content more comfortable for you.
Question 3: Can I change the scrolling direction on a Mac?
Answer: Yes, you can change the scrolling direction on a Mac. The process is similar to changing it on a Windows computer.
1. Click on the Apple menu in the top-left corner of the screen and select “System Preferences”.
2. In the System Preferences window, click on the “Mouse” or “Trackpad” option.
3. Look for the “Scroll & Zoom” tab and click on it.
4. Here, you will find the option to change the scrolling direction. It may be labeled as “Scroll direction: Natural” or “Scrolling: Normal”.
5. Uncheck the box or toggle the switch to reverse the scrolling direction.
6. Close the System Preferences window to save the changes.
Your mouse scrolling direction on your Mac should now be changed as per your preference.
Question 4: How can I revert back to the default scrolling direction?
Answer: If you want to revert back to the default scrolling direction, follow these steps:
1. Go to the “Settings” or “Control Panel” on your computer.
2. Look for the “Mouse” or “Mouse and Touchpad” option and click on it.
3. In the settings window, find the “Scrolling” or “Scroll” tab.
4. Locate the option to change the scrolling direction.
5. Toggle the switch or check the box to disable the reverse scrolling direction.
6. Click “Apply” or “OK” to save the changes.
Your mouse scrolling direction should now be reverted back to the default setting.
Question 5: Can I change the scrolling direction for specific applications only?
Answer: Yes, some applications allow you to change the scrolling direction independently of the system settings. However, this feature may not be available in all applications.
To change the scrolling direction for specific applications:
1. Open the application for which you want to change the scrolling direction.
2. Go to the application’s settings or preferences.
3. Look for the “Scrolling” or “Mouse” options.
4. Find the option to change the scrolling direction and modify it according to your preference.
5. Save the changes and exit the settings or preferences window.
The scrolling direction for that specific application should now be changed as per your settings, while the system-wide scrolling direction remains unaffected.

How To Reverse The Mouse Scroll Direction In Windows 10
In conclusion, changing the mouse scrolling direction is a simple yet powerful customization that can greatly enhance your browsing and scrolling experience. Whether you prefer the traditional scroll direction or want to switch it up for a more intuitive navigation, the process is straightforward and can be easily accomplished on various operating systems and devices.
By taking control of your mouse scrolling direction, you can personalize your computing experience and optimize it to match your preferences. Whether you’re a seasoned computer user or a beginner, this straightforward customization allows you to have a more seamless and efficient interaction with your device. So go ahead and explore the settings, experiment with different scrolling directions, and find the one that feels most natural and comfortable to you. With a few simple clicks, you can revolutionize the way you navigate through web pages and documents, making your digital journey all the more enjoyable and personalized.

