Are you finding it frustrating to navigate your Chromebook with a mouse that’s too slow or too fast? Don’t worry, we’ve got you covered. In this guide, we will walk you through the simple yet essential process of changing your mouse sensitivity on a Chromebook. Whether you’re a student, a professional, or simply someone who relies heavily on their Chromebook for work or leisure, adjusting your mouse sensitivity can greatly enhance your user experience. So, let’s dive in and discover how you can effortlessly customize your mouse settings to match your preferences and needs.
Imagine a world where your mouse glides smoothly across the screen, responding precisely to your every movement. With just a few easy steps, you can make this a reality on your Chromebook. In this comprehensive tutorial, we will provide you with clear instructions on how to change the mouse sensitivity settings, allowing you to find the perfect balance between speed and control. Whether you prefer lightning-fast cursor movements or a more deliberate and precise cursor, we will guide you through the process, ensuring that your Chromebook adapts to your unique style and preferences. So, grab your Chromebook, get ready to take control, and let’s embark on this journey towards a more personalized and enjoyable user experience.
- Click on the clock in the bottom-right corner of the screen.
- Click on the gear icon to open the Settings menu.
- Scroll down and click on “Device” and then “Touchpad”.
- Adjust the “Mouse speed” slider to increase or decrease the sensitivity.
How to Change Mouse Sensitivity on Chromebook
In this article, we will guide you through the steps to change the mouse sensitivity on your Chromebook. Adjusting the mouse sensitivity can greatly enhance your user experience, allowing you to customize the mouse movement according to your preferences. Whether you need a faster or slower mouse cursor, Chromebook provides you with the flexibility to make this adjustment easily.
Step 1: Accessing the Chromebook Settings
To begin, you need to access the Chromebook settings. Click on the time in the bottom-right corner of the screen. A small pop-up window will appear. Click on the gear icon labeled “Settings.” This will open the Chromebook settings page in a new tab.
Alternatively, you can also access the settings by clicking on the launcher in the bottom-left corner, then selecting the “Settings” icon. This will take you to the same settings page.
Step 2: Adjusting Mouse Sensitivity
Once you are on the Chromebook settings page, scroll down until you find the “Device” section. Here, click on the “Mouse and touchpad” option.
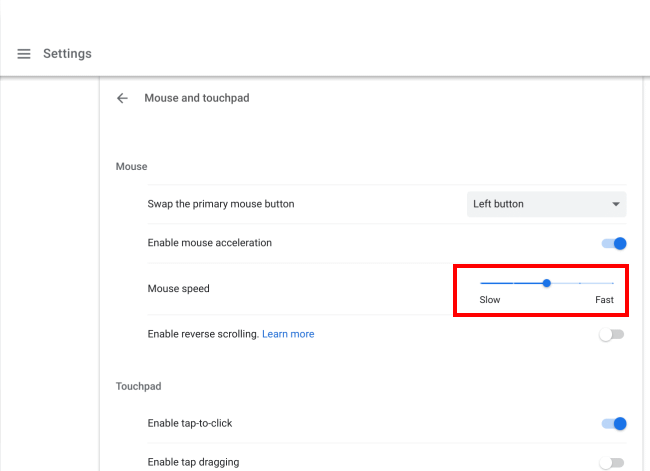
In the “Mouse and touchpad” settings, you will see a slider labeled “Mouse speed.” Drag the slider to the left to decrease the sensitivity and make the mouse cursor slower, or drag it to the right to increase the sensitivity and make the cursor faster. As you move the slider, you will notice the cursor speed changing in real-time.
Step 3: Fine-Tuning the Mouse Sensitivity
If you want more precise control over the mouse sensitivity, you can click on the “Advanced” button below the slider. This will open additional options for fine-tuning the mouse settings.
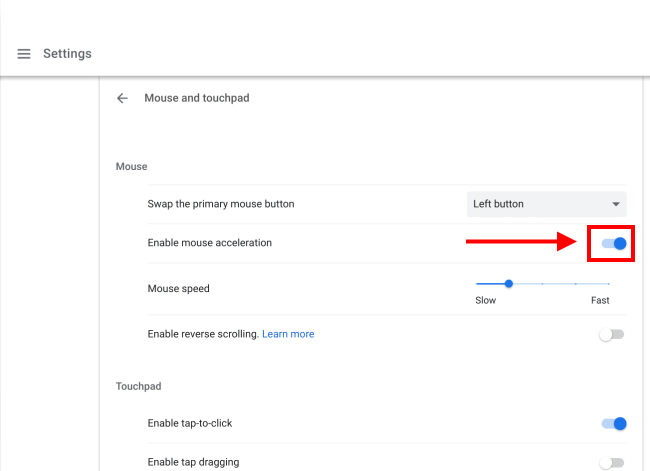
In the advanced settings, you will find options to adjust the mouse acceleration and scroll speed. Mouse acceleration determines how the cursor speed changes based on the distance the mouse is moved. Scroll speed controls how fast the page scrolls when using the mouse wheel. Experiment with these settings to find the perfect balance for your needs.
Step 4: Saving Your Changes
After you have made the desired changes to the mouse sensitivity, click on the “Back” arrow at the top-left corner of the settings page. This will take you back to the main settings menu. Your changes will be automatically saved, and you can close the settings tab.
Now you can enjoy the new mouse sensitivity settings on your Chromebook. If you ever want to revert to the default settings, simply follow the same steps and adjust the slider back to the middle position or click on the “Reset to default” button in the advanced settings.
Frequently Asked Questions
Here are some commonly asked questions about how to change mouse sensitivity on Chromebook.
Q: How do I access the mouse settings on my Chromebook?
To access the mouse settings on your Chromebook, follow these steps:
1. Click on the system tray located at the bottom-right corner of the screen.
2. Click on the gear icon to open the Settings menu.
3. In the Settings menu, click on “Mouse and touchpad” under the “Device” section.
4. Here, you will find various options to customize your mouse settings, including sensitivity.
Q: How can I adjust the mouse sensitivity on my Chromebook?
To adjust the mouse sensitivity on your Chromebook, follow these steps:
1. Open the Settings menu by clicking on the system tray and then the gear icon.
2. Click on “Mouse and touchpad” under the “Device” section.
3. In the Mouse and touchpad settings, you will find a slider for adjusting the mouse sensitivity.
4. Move the slider to the left to decrease sensitivity or to the right to increase sensitivity.
5. Test the sensitivity by moving your mouse and make further adjustments if needed.
Q: Can I change the mouse cursor speed on my Chromebook?
Yes, you can change the mouse cursor speed on your Chromebook. Here’s how:
1. Open the Settings menu by clicking on the system tray and then the gear icon.
2. Click on “Mouse and touchpad” under the “Device” section.
3. In the Mouse and touchpad settings, you will find a slider for adjusting the cursor speed.
4. Move the slider to the left to decrease speed or to the right to increase speed.
5. Test the cursor speed by moving your mouse and make further adjustments if needed.
Q: Are there any keyboard shortcuts to adjust mouse sensitivity on Chromebook?
Unfortunately, there are no specific keyboard shortcuts to adjust mouse sensitivity on Chromebook. However, you can still use keyboard shortcuts to navigate and perform various actions on your Chromebook without relying solely on the mouse. These shortcuts can help improve your productivity and efficiency while using the device.
Q: Why is it important to adjust mouse sensitivity on my Chromebook?
Adjusting mouse sensitivity on your Chromebook is important for several reasons:
1. Personal preference: Everyone has different preferences when it comes to mouse sensitivity. By adjusting it to your liking, you can have a more comfortable and enjoyable user experience.
2. Precision and accuracy: The right mouse sensitivity can improve your precision and accuracy when navigating, clicking, and dragging on your Chromebook.
3. Accessibility: Adjusting mouse sensitivity can make it easier for individuals with certain physical conditions or disabilities to use their Chromebook effectively.
4. Compatibility: If you use different devices with varying mouse sensitivity settings, adjusting it on your Chromebook can help achieve consistency in your workflow.
How To Adjust Mouse Speed On Chromebook [Tutorial]
In conclusion, understanding how to change mouse sensitivity on a Chromebook can greatly enhance your browsing and productivity experience. By customizing the mouse sensitivity to your preference, you can achieve the perfect balance between precision and speed, allowing you to navigate through web pages and applications with ease. Whether you prefer a slower, more controlled movement or a quicker, more responsive one, the ability to adjust the mouse sensitivity on your Chromebook empowers you to personalize your device to suit your unique needs.
In addition to improving your overall user experience, being able to change mouse sensitivity on a Chromebook can also benefit those with physical disabilities or discomfort. By fine-tuning the mouse sensitivity, individuals with motor impairments or conditions such as carpal tunnel syndrome can find a setting that minimizes strain on their hands and wrists, making prolonged computer use more comfortable and manageable. This feature highlights the inclusivity and adaptability of Chromebooks, ensuring that users of all abilities can utilize these devices to their fullest potential.
In conclusion, the ability to change mouse sensitivity on a Chromebook is a valuable tool that allows for personalization, improved accessibility, and enhanced overall user experience. By taking advantage of this feature, you can optimize your browsing, increase productivity, and make your time on a Chromebook more comfortable and efficient. So go ahead, explore the settings and tailor your mouse sensitivity to suit your needs, and unlock the full potential of your Chromebook.

