Are you tired of struggling with your mouse settings on your Chromebook? Do you find it frustrating when your cursor moves too fast or too slow? Well, fret no more! In this guide, we will walk you through the step-by-step process of changing mouse settings on your Chromebook, so you can customize it to your liking and navigate with ease. Whether you’re a student, professional, or simply a Chromebook user, mastering these mouse settings will undoubtedly enhance your user experience and productivity. So, let’s dive in and unlock the full potential of your Chromebook’s mouse settings!
Navigating your way through the vast world of technology can be overwhelming, especially when it comes to customizing your Chromebook’s mouse settings. But fear not, as we are here to guide you through this process in a simple and easy-to-understand manner. By the end of this guide, you will have the knowledge and skills to tweak your mouse settings to suit your preferences, whether it’s adjusting the cursor speed, changing the scrolling direction, or even enabling or disabling the tap-to-click feature. So, if you’re ready to take control of your Chromebook’s mouse settings and optimize your browsing experience, let’s get started on this exciting journey!
- Click on the status area at the bottom right corner of the screen.
- Click on the gear-shaped Settings icon.
- Scroll down and click on “Advanced” to expand the options.
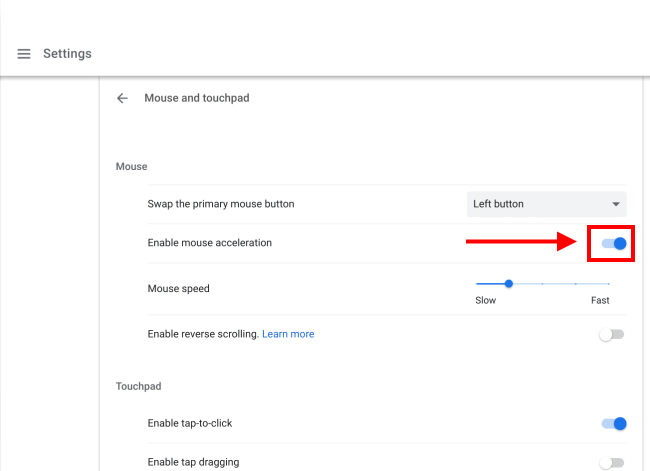
- Under the “Accessibility” section, click on “Mouse and touchpad”.
- Adjust the settings according to your preference.
Introduction
Chromebooks provide a user-friendly and efficient computing experience. If you want to customize your mouse settings on a Chromebook, you’ve come to the right place. In this article, we will guide you through the step-by-step process of changing mouse settings on your Chromebook, allowing you to tailor your mouse experience to your preferences.
Step 1: Accessing the Mouse Settings
To begin, locate the time in the bottom-right corner of your Chromebook’s screen and click on it. A menu will appear; click on the gear icon to access the Settings menu. Within the Settings menu, scroll down and select the “Advanced” option. Next, locate the “Accessibility” section and click on it. Finally, find the “Manage accessibility features” option and click on it to access the mouse settings.
Step 2: Adjusting the Mouse Speed
Once you have accessed the mouse settings, you can start customizing your mouse preferences. The first option you will see is the mouse speed. To adjust the speed, click on the “Mouse speed” slider and drag it left or right. Moving the slider to the left will decrease the speed, while moving it to the right will increase it. Find a speed that feels comfortable for you and makes navigating your Chromebook effortless.
Step 3: Enabling Tap-to-Click
If you prefer using the touchpad with a simple tap rather than physically clicking the buttons, Chromebooks offer the option to enable tap-to-click functionality. To do this, locate the “Tap-to-click” option within the mouse settings and toggle the switch to the “On” position. Once enabled, you can simply tap on the touchpad to perform a click, saving you time and effort.
Step 4: Adjusting Scroll Speed
Chromebooks also allow you to customize the scroll speed of your touchpad. To adjust this setting, locate the “Scroll speed” option within the mouse settings and click on it. A slider will appear, allowing you to modify the scroll speed to your liking. Moving the slider to the left will decrease the scroll speed, while moving it to the right will increase it. Experiment with different scroll speeds to find the one that suits your scrolling habits.
Step 5: Configuring Additional Mouse Options
In addition to the basic mouse settings, Chromebooks offer a range of advanced customization options. Within the mouse settings, you will find options to enable natural scrolling, adjust the cursor size, and configure mouse gestures. Explore these options to further enhance your mouse experience on your Chromebook.
Step 6: Applying the Changes
Once you have adjusted your mouse settings to your desired preferences, click on the “Apply” button to save the changes. Your Chromebook will then apply the new settings, and you can start enjoying your customized mouse experience.
Step 7: Reverting to Default Settings
If at any point you wish to revert to the default mouse settings on your Chromebook, simply access the mouse settings as described in Step 1, and click on the “Reset to default” button. This will restore all mouse settings to their original values.
Conclusion
Customizing your mouse settings on a Chromebook is a simple process that allows you to optimize your user experience. By adjusting the mouse speed, enabling tap-to-click, modifying scroll speed, and exploring additional options, you can tailor your mouse settings to suit your preferences. Remember to apply the changes and enjoy your personalized mouse experience on your Chromebook.
Frequently Asked Questions
In this section, you will find answers to common questions about how to change mouse settings on a Chromebook.
How do I change the mouse speed on my Chromebook?
To change the mouse speed on your Chromebook, follow these steps:
1. Click on the status area in the bottom-right corner of the screen.
2. Click on the gear icon to open the Settings menu.
3. In the Settings menu, click on “Advanced” at the bottom.
4. Under the “Accessibility” section, click on “Mouse and touchpad”.
5. Adjust the slider under “Pointer speed” to increase or decrease the mouse speed.
6. Once you are satisfied with the changes, close the Settings menu.
How do I enable tap-to-click on my Chromebook?
To enable tap-to-click on your Chromebook, follow these steps:
1. Click on the status area in the bottom-right corner of the screen.
2. Click on the gear icon to open the Settings menu.
3. In the Settings menu, click on “Advanced” at the bottom.
4. Under the “Accessibility” section, click on “Mouse and touchpad”.
5. Toggle the switch next to “Tap to click” to enable it.
6. You can now tap on the touchpad to perform a click.
How do I change the scroll direction on my Chromebook?
To change the scroll direction on your Chromebook, follow these steps:
1. Click on the status area in the bottom-right corner of the screen.
2. Click on the gear icon to open the Settings menu.
3. In the Settings menu, click on “Advanced” at the bottom.
4. Under the “Accessibility” section, click on “Mouse and touchpad”.
5. Toggle the switch next to “Natural scrolling” to enable or disable it.
6. With natural scrolling enabled, you will scroll up by swiping down on the touchpad.
How do I change the mouse cursor size on my Chromebook?
To change the mouse cursor size on your Chromebook, follow these steps:
1. Click on the status area in the bottom-right corner of the screen.
2. Click on the gear icon to open the Settings menu.
3. In the Settings menu, click on “Advanced” at the bottom.
4. Under the “Accessibility” section, click on “Mouse and touchpad”.
5. Adjust the slider under “Cursor size” to increase or decrease the cursor size.
6. Once you are satisfied with the changes, close the Settings menu.
How do I enable right-click on my Chromebook?
To enable right-click on your Chromebook, follow these steps:
1. Click on the status area in the bottom-right corner of the screen.
2. Click on the gear icon to open the Settings menu.
3. In the Settings menu, click on “Advanced” at the bottom.
4. Under the “Accessibility” section, click on “Mouse and touchpad”.
5. In the “Mouse and touchpad” settings, enable the “Enable tap dragging” option.
6. With tap dragging enabled, you can perform a right-click by tapping with two fingers on the touchpad.
In conclusion, learning how to change mouse settings on your Chromebook can greatly enhance your user experience and productivity. By taking the time to customize your mouse settings, you can tailor your device to suit your unique needs and preferences. Whether it’s adjusting the cursor speed, enabling natural scrolling, or changing the button functions, having control over these settings allows you to maximize your efficiency and comfort while using your Chromebook.
Furthermore, being familiar with the process of changing mouse settings on a Chromebook empowers you to troubleshoot any issues that may arise. Whether you’re experiencing difficulties with your touchpad or external mouse, having the knowledge to make necessary adjustments can save you time and frustration. By following the step-by-step guide outlined in this article, you can confidently navigate through the settings menu and customize your mouse settings to your liking. So, seize the opportunity to harness the full potential of your Chromebook by exploring and modifying its mouse settings today.

