Are you tired of straining your eyes while using your MacBook? Do you find yourself constantly squinting to see the tiny mouse cursor on the screen? Well, fret no more! In this comprehensive guide, we will walk you through the simple steps to change the mouse size on your MacBook, making it easier and more comfortable for you to navigate your computer.
Whether you’re a designer, a programmer, or simply a heavy computer user, having a larger mouse cursor can greatly enhance your productivity and reduce eye strain. With the built-in accessibility features on your MacBook, adjusting the mouse size is a breeze. So, grab your MacBook, and let’s dive in to discover how you can customize your mouse cursor and enjoy a more pleasant computing experience.
How to Change Mouse Size on MacBook:
- Click on the Apple menu in the top-left corner of your screen and select “System Preferences”.
- Click on “Accessibility”.
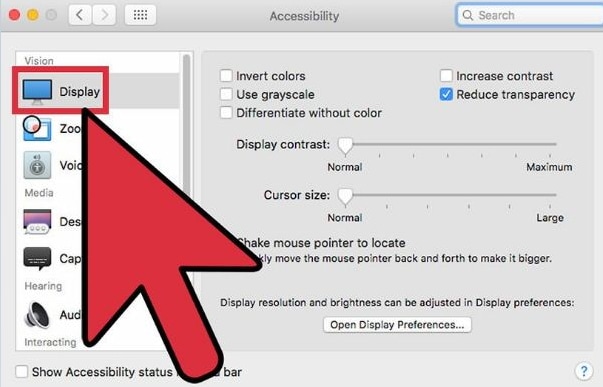
- In the left sidebar, select “Display”.
- Adjust the “Cursor size” slider to increase or decrease the mouse size.
How to Change Mouse Size on MacBook
In this step-by-step guide, we will walk you through the process of changing the mouse size on your MacBook. Whether you prefer a larger or smaller cursor, adjusting the mouse size can greatly enhance your user experience. Follow the instructions below to customize the mouse size on your MacBook.
Step 1: Accessing System Preferences
The first step is to open the System Preferences on your MacBook. You can do this by clicking on the Apple logo located in the top-left corner of your screen and selecting “System Preferences” from the dropdown menu. Alternatively, you can access System Preferences from the dock, which is usually located at the bottom of your screen.
Once the System Preferences window opens, locate and click on the “Accessibility” icon. This will open the Accessibility preferences panel, where you can make various adjustments to improve the usability of your MacBook.
Step 2: Navigating to Display Preferences
Within the Accessibility preferences panel, you will find a list of options on the left-hand side. Scroll down until you see “Display” and click on it. The Display preferences allow you to modify various visual settings on your MacBook, including the mouse size.
On the right-hand side of the window, you will see a slider labeled “Cursor Size.” Drag the slider to the left to decrease the mouse size or to the right to increase it. As you move the slider, you will see a preview of the cursor size change in real-time. Find the size that suits your preferences and continue to the next step.
Step 3: Applying the Changes
Once you have adjusted the mouse size to your liking, close the Display preferences window. Your changes will be applied automatically, and you can now test the new mouse size by moving your cursor around the screen.
If you find that the new mouse size is not ideal, you can repeat the steps above to readjust it until you achieve the desired result. Experimenting with different sizes will allow you to find the perfect balance between visibility and aesthetics.
Step 4: Additional Mouse Settings
In addition to changing the mouse size, macOS offers various other customization options for your mouse. To explore these options, return to the Accessibility preferences panel and click on the “Pointer Control” category.
Here, you can adjust settings such as tracking speed, double-click speed, and scrolling speed. Take some time to explore these settings and fine-tune them according to your preferences. Remember to click “Apply” or “OK” after making any changes to ensure they take effect.
Step 5: Enjoy Your Customized Mouse Size
Congratulations! You have successfully changed the mouse size on your MacBook. Whether you prefer a larger cursor for better visibility or a smaller one for a cleaner look, customizing the mouse size can greatly enhance your overall user experience. Enjoy navigating your MacBook with your newly adjusted mouse size!
Frequently Asked Questions
Here are some common questions about changing the mouse size on MacBook:
Q: How do I change the mouse size on my MacBook?
To change the mouse size on your MacBook, you can follow these steps:
1. Click on the Apple logo in the top-left corner of the screen and select “System Preferences.”
2. In the System Preferences window, click on “Accessibility.”
3. In the Accessibility preferences, select “Display” from the left-hand sidebar.
4. Under the “Cursor” section, you will find a slider labeled “Cursor size.” Adjust the slider to increase or decrease the mouse size as desired.
5. Once you are satisfied with the new mouse size, close the Accessibility preferences window.
Q: Can I change the mouse size for different users on my MacBook?
Yes, you can change the mouse size individually for each user on your MacBook. Each user can have their own custom mouse size setting. Simply follow the steps mentioned in the previous question for each user account and adjust the mouse size according to their preference.
Remember that the changes made to the mouse size are specific to each user, so each user can have a different mouse size setting.
Q: Is it possible to make the mouse cursor more visible on my MacBook?
Yes, it is possible to make the mouse cursor more visible on your MacBook. In addition to changing the mouse size, you can also enable other accessibility options to enhance the visibility of the cursor.
For example, you can enable the “Shake mouse pointer to locate” option, which causes the cursor to temporarily increase in size when you shake the mouse or trackpad. This can make it easier to locate the cursor on the screen.
Q: Why is the mouse size not changing on my MacBook?
If the mouse size is not changing on your MacBook, there could be a few reasons for this. Firstly, ensure that you are adjusting the mouse size in the correct settings. Go to “System Preferences,” then “Accessibility,” and finally “Display” to find the cursor size slider.
If the cursor size slider is not working, try restarting your MacBook and then attempt to change the mouse size again. If the issue persists, you may need to update your operating system or check for any third-party software conflicts that could be affecting the mouse settings.
Q: Can I change the mouse size on my MacBook using third-party software?
Yes, there are third-party software options available that allow you to change the mouse size on your MacBook. These software programs often provide more customization options and flexibility for adjusting the mouse size, shape, and color.
However, it is important to research and choose reliable third-party software from trusted sources to ensure the security and compatibility of your MacBook. Always read reviews and check for compatibility with your specific MacBook model and operating system version before installing any third-party software.
By following the simple steps outlined in this guide, you can easily adjust the mouse size on your MacBook to optimize your user experience. Remember to explore the Accessibility settings, experiment with different cursor sizes, and take advantage of third-party software if necessary. Embrace the power of personalization and make your MacBook truly your own. With these tips in mind, you can navigate your MacBook with ease and enjoy a comfortable and tailored experience every time you use it.

