Are you tired of being limited by the default DPI settings on your Razer mouse? Do you find it frustrating that you can only adjust the sensitivity of your mouse through the Synapse software? Well, fret no more! In this guide, we will show you how to change the DPI of your Razer mouse without the need for Synapse. Whether you’re a gamer looking for that perfect sensitivity or a professional needing precise cursor control, this tutorial will equip you with the knowledge to unlock the full potential of your Razer mouse.
For many Razer mouse users, the Synapse software has been a double-edged sword. While it provides a range of customization options, its reliance on the internet and the hassle of logging in can be a real inconvenience. Furthermore, not all users have access to Synapse, especially on systems where the software is not compatible or allowed due to administrative restrictions. That’s where this guide comes in handy – we’ll show you a simple and effective method to adjust your Razer mouse DPI directly, without the need for any additional software. So, let’s dive in and take control of your Razer mouse’s sensitivity, giving you the freedom to optimize your gaming or work experience to your heart’s content!
- Turn off your Razer mouse.
- Press and hold the left, middle, and right mouse buttons simultaneously.
- While holding the buttons, turn on your mouse.
- Release the buttons when the mouse’s LED starts blinking.
- Use the scroll wheel to adjust the DPI settings.
- Press the left mouse button to confirm the new DPI.
How to Change Razer Mouse DPI without Synapse
In this step-by-step guide, we will explain how to change the DPI (Dots Per Inch) settings on your Razer mouse without using the Razer Synapse software. This method is useful if you don’t have access to the software or prefer to make the adjustments manually. Follow the instructions below to customize your mouse’s DPI settings to your liking.
Step 1: Accessing the Mouse Settings
To begin, open the Control Panel on your Windows computer. You can do this by clicking on the Start menu and searching for “Control Panel.” Once the Control Panel window opens, locate the “Mouse” or “Mouse and Touchpad” option and click on it. This will open the Mouse Properties window, where you can make changes to your mouse settings.
Step 2: Navigating to the Pointer Options Tab
In the Mouse Properties window, navigate to the “Pointer Options” tab. This tab contains various settings related to your mouse’s behavior, including the DPI settings. Click on the “Pointer Options” tab to proceed.
Step 3: Adjusting the DPI Settings
On the Pointer Options tab, you will find a section called “Motion.” Within this section, locate the “Select a pointer speed” slider. By default, the slider is set to the middle position, which corresponds to the standard DPI setting of your mouse. To change the DPI, move the slider to the left or right to decrease or increase the pointer speed, respectively. As you move the slider, the DPI value will change accordingly.
It’s important to note that the available DPI options may vary depending on your specific Razer mouse model. Some mice offer a limited range of DPI settings, while others may allow for more precise adjustments. Experiment with different DPI values to find the sensitivity that suits your needs best.
Step 4: Applying the Changes
Once you have selected your desired DPI setting, click on the “Apply” button at the bottom of the Mouse Properties window. This will apply the changes and update your mouse’s DPI settings immediately. You can then test the new sensitivity by moving your mouse on the screen and observing how the pointer responds.
Step 5: Fine-Tuning the DPI
If you find that the DPI setting you initially selected is not ideal, you can go back to the Pointer Options tab and make further adjustments until you achieve the desired sensitivity. Repeat Step 3 to modify the DPI slider, and then click “Apply” to save the changes. Remember to test the new settings each time to ensure they feel comfortable and responsive to your movements.
Step 6: Exiting the Mouse Properties Window
Once you are satisfied with your DPI settings, click on the “OK” button at the bottom of the Mouse Properties window to exit. Your changes will be saved, and you can start using your Razer mouse with the newly configured DPI without relying on Razer Synapse.
Step 7: Enjoying Customized DPI Settings
By following these steps, you have successfully changed the DPI settings of your Razer mouse without using the Synapse software. Now you can enjoy a personalized mouse experience tailored to your preferences. Whether you need faster cursor movements for gaming or precise control for graphic design, adjusting the DPI settings manually allows you to optimize your mouse’s performance without the need for additional software.
Frequently Asked Questions
In this section, we will address some common questions about changing Razer mouse DPI without Synapse.
Q: How can I change the DPI of my Razer mouse without using Synapse?
You can change the DPI of your Razer mouse without using Synapse by following these steps:
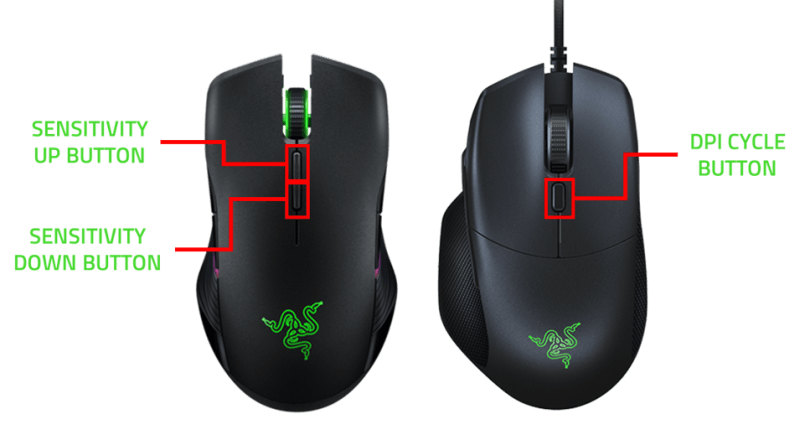
1. Locate the DPI button on your Razer mouse. It is usually located on the top surface, near the scroll wheel.
2. Press and hold the DPI button for a few seconds until the DPI indicator light starts blinking.
3. While the DPI light is blinking, use the scroll wheel to adjust the DPI setting. Each scroll notch corresponds to a different DPI level.
4. Release the DPI button to save the new DPI setting. The DPI light will stop blinking, indicating that the change has been applied.
Please note that the steps may vary slightly depending on the specific model of your Razer mouse.
Q: Can I change the DPI of my Razer mouse without Synapse software on a Mac?
Yes, you can change the DPI of your Razer mouse without using Synapse software on a Mac. The process is similar to changing the DPI on a Windows PC. Here’s how:
1. Locate the DPI button on your Razer mouse. On a Mac, it is usually located on the top surface, near the scroll wheel.
2. Press and hold the DPI button for a few seconds until the DPI indicator light starts blinking.
3. While the DPI light is blinking, use the scroll wheel to adjust the DPI setting. Each scroll notch corresponds to a different DPI level.
4. Release the DPI button to save the new DPI setting. The DPI light will stop blinking, indicating that the change has been applied.
Please note that the steps may vary slightly depending on the specific model of your Razer mouse and the version of macOS you are using.
Q: Is it possible to change the DPI of my Razer mouse without Synapse permanently?
No, it is not possible to change the DPI of your Razer mouse without Synapse permanently. The DPI settings you change without Synapse are temporary and will revert to the default settings once you restart your computer or unplug the mouse.
If you want to have permanent DPI settings without using Synapse, you will need to install and use the Synapse software. Synapse allows you to save and apply custom DPI settings that will persist even after restarting your computer or reconnecting the mouse.
Q: Can I adjust the DPI of my Razer mouse without Synapse on a gaming console?
No, you cannot adjust the DPI of your Razer mouse without Synapse on a gaming console. The Synapse software is only available for Windows and Mac operating systems, and it is not compatible with gaming consoles such as Xbox or PlayStation.
If you want to change the DPI settings of your Razer mouse while gaming on a console, you will need to use the default DPI settings or configure the DPI using Synapse on a compatible computer before connecting the mouse to the console.
Q: Are there any alternative software options to change the DPI of my Razer mouse without Synapse?
Yes, there are some alternative software options available that allow you to change the DPI of your Razer mouse without using Synapse. One popular alternative is X-Mouse Button Control, which is a free and lightweight software that enables custom button mapping and DPI adjustments for various mouse models, including Razer.
However, it’s important to note that using third-party software may not provide the same level of customization and compatibility as the official Synapse software. Additionally, third-party software may not be supported or endorsed by Razer, so it’s advisable to use them at your own discretion.
How to change your dpi without any software (or a ‘on the fly dpi changer”)
In conclusion, changing the DPI settings on your Razer mouse without Synapse is an easily achievable task that can greatly enhance your gaming experience. By following the step-by-step instructions outlined in this guide, you can take control of your mouse’s sensitivity and customize it to suit your preferences. Whether you are a casual gamer or a professional e-sports player, having the ability to adjust your mouse’s DPI without relying on software can be a game-changer.
Furthermore, this method allows you to make quick changes on-the-go, without the need for a stable internet connection or access to the Synapse software. This level of flexibility and independence empowers you to optimize your gaming performance, no matter where you are. So, put these tips into practice and witness the difference it can make in your gameplay. Take charge of your Razer mouse’s DPI settings and elevate your gaming experience to new heights.

