Are you a Mac user who recently purchased a Logitech mouse and now find yourself struggling to configure the buttons to your liking? Look no further! In this comprehensive guide, we will delve into the world of Logitech mouse button configuration on Mac, providing you with all the information you need to personalize your mouse settings and enhance your productivity. Whether you are a gamer seeking to optimize your gaming experience or a professional looking to streamline your workflow, mastering the art of Logitech mouse button configuration is a game-changer.
Logitech, a renowned leader in computer peripherals, offers a wide range of mice with customizable buttons that can be tailored to suit your specific needs. However, navigating the intricacies of mouse button configuration on a Mac can be a daunting task, especially for those unfamiliar with the process. Fret not, as we will guide you step-by-step through the configuration process, demystifying the intricacies and empowering you to take control of your Logitech mouse. So, grab your mouse, fire up your Mac, and get ready to unlock the full potential of your Logitech device.
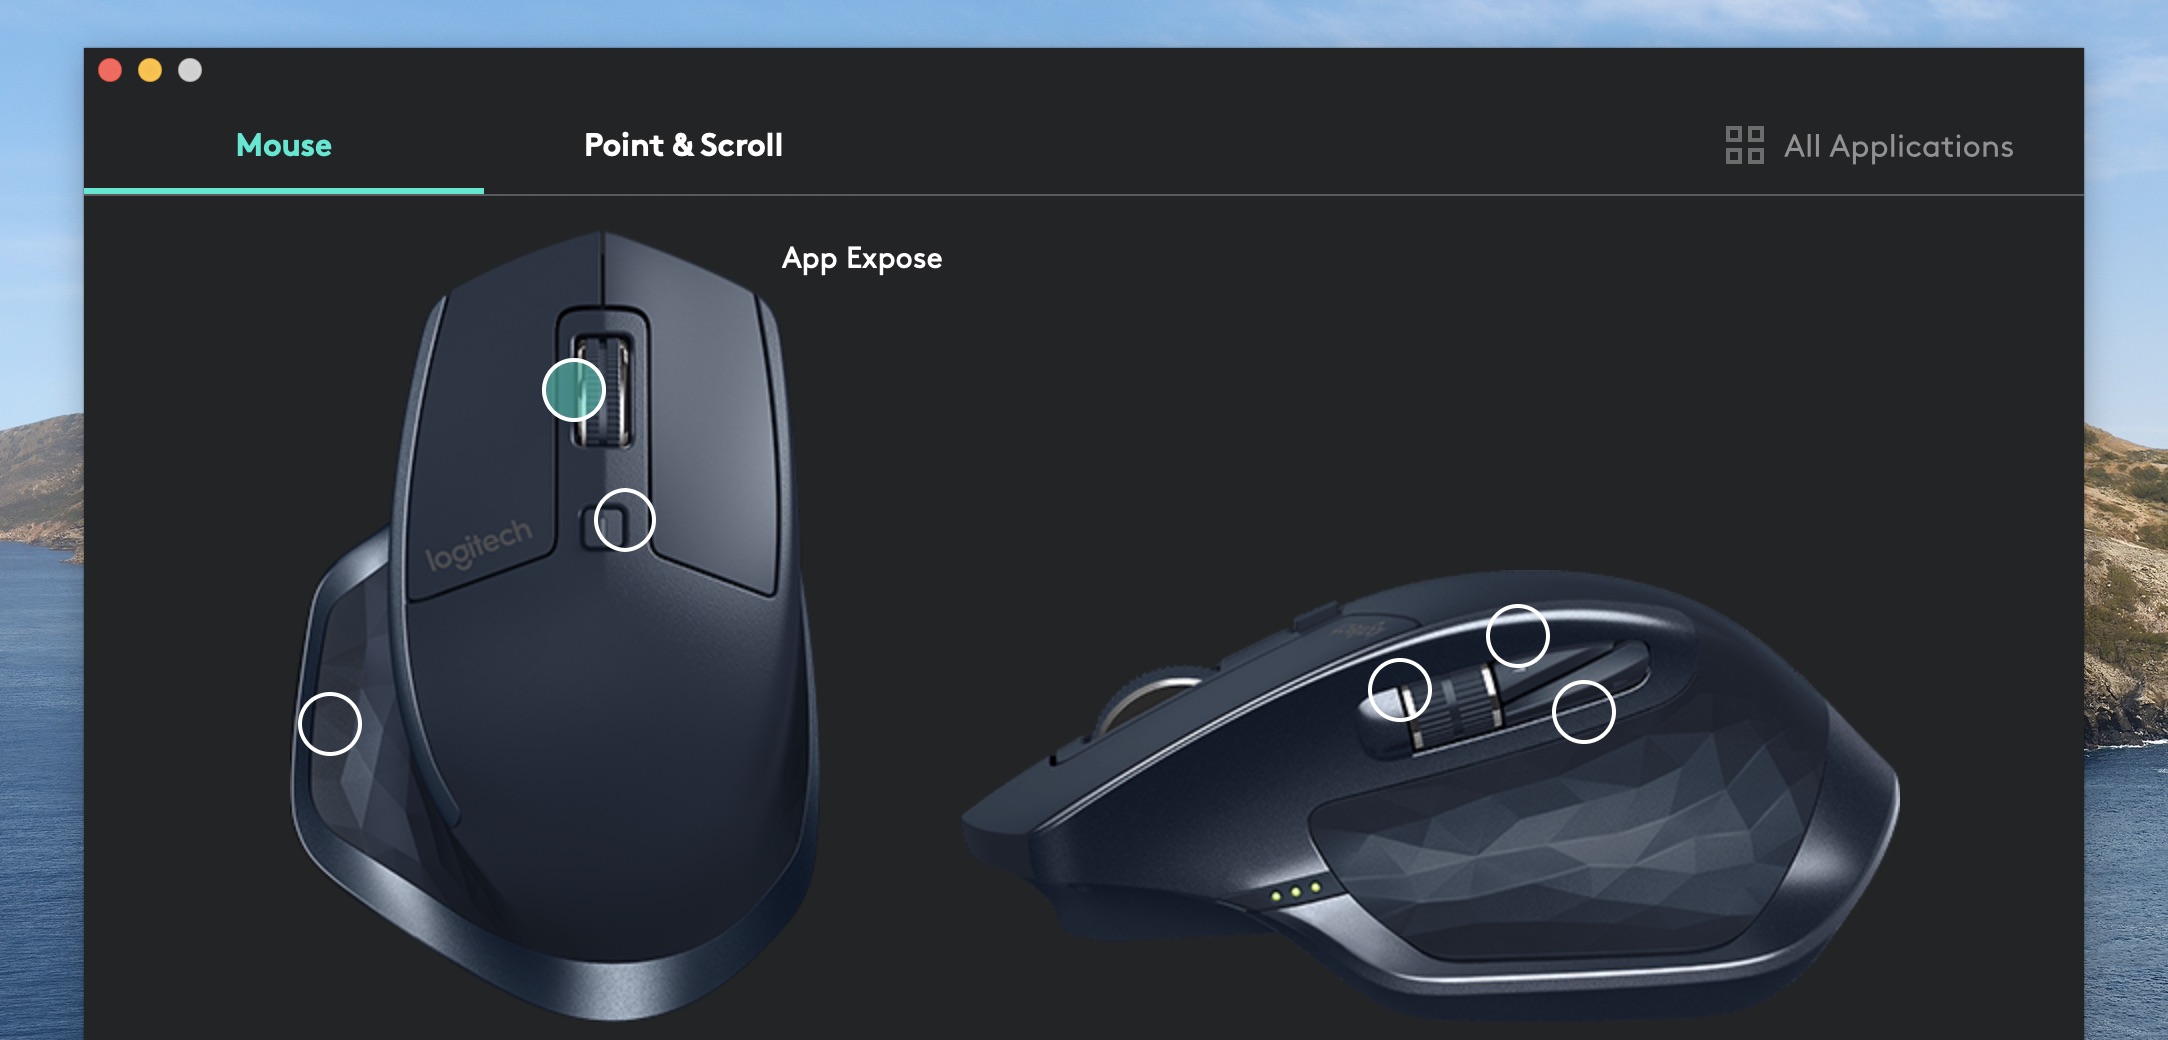
How to Configure Logitech Mouse Buttons on Mac:
- Download and install the Logitech Options software from the Logitech website.
- Connect your Logitech mouse to your Mac using the provided USB receiver or Bluetooth.
- Open the Logitech Options software and select your mouse from the list of connected devices.
- Click on the “Button customization” option to configure the mouse buttons.
- Assign functions to each button by selecting them from the dropdown menu.
- Click “Apply” to save the changes and start using your customized Logitech mouse on your Mac.
How to Configure Logitech Mouse Buttons on Mac
Logitech mice are known for their versatility and customization options, allowing users to configure the buttons according to their preferences. If you are a Mac user and want to personalize your Logitech mouse buttons, follow these step-by-step instructions to easily configure them.
Step 1: Install Logitech Options Software
The first step in configuring your Logitech mouse buttons on Mac is to install the Logitech Options software. This software provides a user-friendly interface that allows you to customize the mouse buttons and other settings. Follow these steps to install the software:
- Open your web browser and go to the Logitech website.
- Navigate to the Support section and search for your mouse model.
- Download the Logitech Options software compatible with your Mac operating system.
- Once the download is complete, open the installer package and follow the on-screen instructions to install the software.
Step 2: Launch Logitech Options and Connect Your Mouse
After installing the Logitech Options software, it’s time to launch the application and connect your mouse. Here’s what you need to do:
- Locate the Logitech Options software in your Applications folder and open it.
- Connect your Logitech mouse to your Mac using the provided USB receiver or Bluetooth connection.
- Wait for the software to detect your mouse. Once detected, you will see a list of available customization options.
Step 3: Customize Mouse Buttons
Now that you have the Logitech Options software running and your mouse connected, you can start customizing the buttons. Follow these steps to configure the mouse buttons:
- In the Logitech Options software, navigate to the “Mouse” tab.
- Click on the button you want to configure. The selected button will be highlighted.
- Choose the desired function for the button from the drop-down menu. You can assign commands, keystrokes, gestures, or even launch applications.
- Repeat the process for each button you want to customize.
Step 4: Save and Apply Settings
After configuring the mouse buttons to your liking, it’s important to save and apply the settings. Follow these final steps:
- Click on the “OK” or “Apply” button to save the changes you made.
- Disconnect and reconnect your Logitech mouse to ensure the new button configurations are applied.
- Test the buttons to verify that they are working as intended.
Step 5: Fine-Tune Settings (Optional)
If you want to further refine your Logitech mouse button configurations, you can explore additional settings in the Logitech Options software. Here are some options you might find useful:
- Adjust the scroll speed and direction.
- Enable or disable mouse acceleration.
- Customize pointer speed and sensitivity.
- Configure gestures, such as swiping and zooming.
Step 6: Enjoy Your Customized Mouse Buttons
Once you have completed the configuration process and fine-tuned your settings, you can now enjoy the benefits of your personalized Logitech mouse buttons on your Mac. Whether you use them for productivity, gaming, or any other purpose, having customized buttons can greatly enhance your user experience.
Frequently Asked Questions
Here are some commonly asked questions about how to configure Logitech mouse buttons on Mac.
Question 1: How do I configure Logitech mouse buttons on Mac?
Configuring Logitech mouse buttons on Mac is a simple process. Follow these steps:
1. Start by installing the Logitech Options software on your Mac. This software allows you to customize your mouse settings.
2. Once installed, open the Logitech Options software and connect your Logitech mouse to your Mac.
3. In the Logitech Options software, navigate to the “Mouse” tab.
4. Here, you will find a list of available button functions. Select the button you want to configure and choose the desired function from the drop-down menu.
5. Repeat this process for all the buttons you wish to configure on your Logitech mouse.
Question 2: Can I assign custom functions to Logitech mouse buttons on Mac?
Yes, you can assign custom functions to Logitech mouse buttons on your Mac using the Logitech Options software. Simply follow the steps mentioned in the previous answer to access the button functions in the software.
Once you have selected the button you want to configure, choose the “Customize” option from the drop-down menu. This will allow you to assign a custom function to the selected button.
You can choose from a variety of functions such as launching applications, executing keystrokes, and controlling media playback. Explore the options available in the Logitech Options software to find the custom functions that suit your needs.
Question 3: Can I configure different button settings for different applications on my Mac?
Yes, you can configure different button settings for different applications on your Mac using the Logitech Options software. This feature is called “Application Specific Settings.”
To configure application-specific settings, follow these steps:
1. Open the Logitech Options software and navigate to the “Mouse” tab.
2. Click on the “Add Application” button.
3. Select the application for which you want to configure specific button settings.
4. Once the application is added, you can customize the button functions specifically for that application.
5. Repeat this process for each application for which you want to configure different button settings.
Question 4: How do I restore default button settings on my Logitech mouse?
If you want to restore the default button settings on your Logitech mouse, you can do so through the Logitech Options software. Follow these steps:
1. Open the Logitech Options software and navigate to the “Mouse” tab.
2. On the bottom-right corner of the software, you will find a “Restore Defaults” button. Click on it.
3. A confirmation dialog will appear. Click “OK” to proceed with restoring the default button settings.
4. Once the default settings are restored, you can customize the button functions according to your preference.
Question 5: Is the Logitech Options software compatible with all Logitech mice?
The Logitech Options software is compatible with most Logitech mice, including both wired and wireless models. However, it is always recommended to check the official Logitech website for the specific compatibility details of your mouse model.
Before installing the Logitech Options software, make sure your Logitech mouse is supported. In case your mouse is not compatible, you may need to use alternative software provided by Logitech specifically for your mouse model.
:max_bytes(150000):strip_icc()/A2-UseaMulti-ButtonMouseWithYourMac-annotated-b0bf501b44f2479db6b6c6e0def19fb9.jpg)
Remember, the process may vary depending on the specific Logitech mouse model you have. However, by following the general steps outlined in this guide, you should be able to successfully configure the buttons on your Logitech mouse. In case you encounter any difficulties, don’t hesitate to refer to the Logitech support website or reach out to their customer service for further assistance. Embrace the opportunity to personalize your Logitech mouse and unlock its full potential on your Mac. Happy configuring!

