Welcome to the world of Mac, where we’ll show you how to hide that pesky cursor in just a few simple steps. So, if you’re tired of the cursor stealing the spotlight when you’re trying to focus on important tasks, you’ve come to the right place. Let’s dive in and discover how to hide the cursor on your Mac effortlessly.
Mac users, rejoice! We have the solution to make that cursor disappear like magic. Whether you’re working on a top-secret project, giving a presentation, or simply want a distraction-free screen, hiding the cursor is a game-changer. No more distractions, no more interruptions, just pure productivity at its finest.
Now, you might be wondering, “How do I actually do it?” Don’t worry, we’ve got you covered. In this guide, we’ll walk you through the simple steps to hide the cursor on your Mac, so you can reclaim control over your screen and focus on what matters most. So, without further ado, let’s get started and banish that cursor from sight!
1. Go to “System Preferences” on your Mac.
2. Click on “Accessibility” and select “Display” from the sidebar.
3. Check the box next to “Shake mouse pointer to locate” to enable the feature.
4. Shake your mouse or trackpad to temporarily hide the cursor.
5. To bring back the cursor, simply move your mouse or trackpad again.
Now you can hide your cursor whenever you want on your Mac!

How to Hide Cursor on Mac: A Complete Guide
How to Hide Cursor on Mac using System Preferences
Step 1: Open System Preferences
Click on the Apple menu in the top left corner of your screen and select “System Preferences” from the drop-down menu.
Step 2: Access Accessibility Settings
In the System Preferences window, click on the “Accessibility” icon.
Step 3: Enable “Shake Mouse Pointer to Locate”
In the Accessibility settings, click on “Display” in the left-hand sidebar. Then, check the box next to “Shake mouse pointer to locate.” This will make the cursor disappear when you shake your mouse vigorously and reappear when you stop shaking.
This method offers a quick and convenient way to hide your cursor on Mac. However, if you prefer a more permanent solution or want additional customization options, third-party applications might be the right choice for you.
Third-Party Applications for Hiding Cursor on Mac
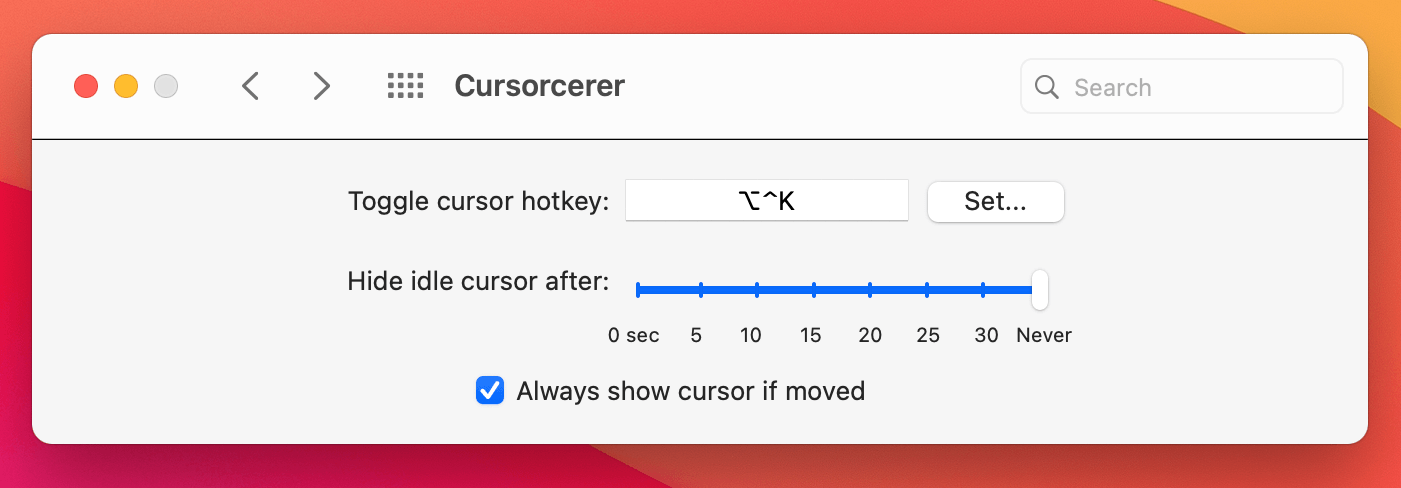
1. Cursorcerer
Step 1: Download and Install Cursorcerer
Go to the Cursorcerer website and download the application. Once downloaded, open the installer and follow the on-screen instructions to install the application on your Mac.
Step 2: Set the Delay Time
Launch Cursorcerer and adjust the delay time in the preferences. This determines how long the cursor remains visible before automatically hiding.
Step 3: Enjoy a Hidden Cursor
Once the delay time is set, Cursorcerer will hide your cursor after the specified interval. Move your mouse to make it reappear.
Cursorcerer offers a seamless experience and is highly customizable. You can adjust various settings like delay time and exceptions to suit your preferences.
2. Unclutter
Step 1: Download and Install Unclutter
Visit the Unclutter website and download the application. Install it on your Mac by following the provided instructions.
Step 2: Enable Cursor Hiding
Launch Unclutter and go to the Preferences menu. In the Cursor section, enable the “Hide Cursor” option.
Step 3: Explore Additional Features
Unclutter offers various other features like a notepad and clipboard manager. Take some time to explore and utilize these additional functionalities.
With Unclutter, you not only get the cursor hiding functionality but also a range of other productivity tools at your fingertips.
Extra Tips for Hiding Cursor on Mac
1. Use Keyboard Shortcut
If you prefer a quick way to hide and reveal your cursor, you can create a custom keyboard shortcut. Open the Keyboard preferences in System Preferences, go to the “Shortcuts” tab, select “Accessibility” from the left-hand sidebar, and set a shortcut for “Shake mouse pointer to locate.”
2. Third-Party Mouse Software
If you use a third-party mouse and it comes with custom software, you might find options to hide the cursor within its settings. Explore the software bundled with your mouse for additional customization options.
3. Experiment with Cursor Styles
Although it won’t hide the cursor completely, changing the cursor style to a smaller or less noticeable design can make it blend in better with the background. You can change cursor styles in the Accessibility settings on your Mac.
By following these tips and using the methods mentioned earlier, you can effortlessly hide your cursor on your Mac and enjoy a distraction-free working experience.
In conclusion, hiding the cursor on your Mac can improve focus and enhance productivity. Whether you prefer built-in settings or third-party applications, there are various options available to suit your needs. Experiment with different methods and find the one that works best for you. So, go ahead, hide that cursor, and get into your workflow without any distractions!
Key Takeaways: How to Hide Cursor on Mac
- Option 1: Use a third-party app like Cursorcerer to hide the cursor.
- Option 2: Adjust the cursor size to its smallest setting in System Preferences.
- Option 3: Enable the “Shake mouse pointer to locate” feature in Accessibility settings.
- Option 4: Utilize the ‘CursorControl’ command in Terminal to hide the cursor temporarily.
- Option 5: Use the ‘CursorKey’ script to toggle the cursor visibility with a shortcut.
Frequently Asked Questions
Are you wondering how to hide the cursor on your Mac? Look no further! Here are some commonly asked questions about hiding the cursor on a Mac, along with the answers you’ve been searching for.
1. Can I hide the cursor on my Mac temporarily?
Yes, you can hide the cursor on your Mac temporarily. This can be useful when you’re giving a presentation or recording your screen. To do this, go to the Apple menu and select System Preferences. Then, click on Accessibility and choose Display from the sidebar. Check the box that says “Shake mouse pointer to locate” to hide the cursor temporarily. When you want to show the cursor again, just move your mouse or trackpad.
Keep in mind that this method only hides the cursor temporarily and it will reappear as soon as you move the mouse or trackpad. If you want to permanently hide the cursor on your Mac, there are other methods you can use.
2. How can I permanently hide the cursor on my Mac?
To permanently hide the cursor on your Mac, you can use a third-party application such as “Cursorcerer” or “Mousecape.” These applications allow you to customize your cursor settings and choose to hide it entirely. Simply download and install the application that suits your needs, follow the instructions provided, and you’ll be able to hide the cursor on your Mac permanently.
Keep in mind that using third-party applications to hide your cursor may require additional steps or settings adjustments. Always make sure to read the documentation provided with the software for proper installation and usage instructions.
3. Is there a way to hide the cursor on specific applications only?
Yes, it is possible to hide the cursor on specific applications only. If you want to hide the cursor while using a certain application, you can use the built-in Mac feature called “Automator.” Automator allows you to create custom workflows or scripts to automate tasks on your Mac.
To hide the cursor on a specific application using Automator, follow these steps:
- Launch Automator from the Applications folder.
- Choose “Application” when prompted to choose a template.
- In the search bar, type “Run AppleScript” and drag the corresponding action to the workflow area.
- Replace the default AppleScript code with the following: “tell application “System Events” to keystroke “f14″ using {control down}”
- Save the workflow as an application and run it whenever you want to hide the cursor for that specific application.
4. Can I hide the cursor while recording my screen on a Mac?
Yes, you can hide the cursor while recording your screen on a Mac. If you’re using the built-in screen recording feature, you can simply click on the Options button in the recording window and uncheck the “Show Mouse Clicks in Recording” option. This will hide the cursor during your screen recording.
If you’re using a third-party screen recording application, the method may vary. However, most screen recording applications have options or settings to hide the cursor during the recording. Refer to the documentation or settings of your specific screen recording software to find the option for hiding the cursor.
5. How can I show the hidden cursor on my Mac?
If you have hidden the cursor on your Mac and want to show it again, you can simply move your mouse or trackpad. When you move the mouse or trackpad, the hidden cursor will reappear on your screen. This applies to both temporary hiding (using the “Shake mouse pointer to locate” option) and permanent hiding (using third-party applications).
If you have hidden the cursor on a specific application using Automator, you can stop the application that triggers the hidden cursor workflow. This will bring back the cursor for that specific application. Alternatively, you can also quit the Automator application itself to show the cursor again.
Summary
So, if you want to hide the cursor on your Mac, there are a few simple tricks you can try. You can use the hot corners feature in System Preferences to activate a screen saver with no cursor. Another option is to use a third-party app like Mousecape to replace the cursor with a transparent image. By following these steps, you can easily hide the cursor on your Mac and enjoy a distraction-free experience.
In conclusion, hiding the cursor on a Mac is a useful feature that can improve your productivity. Whether you want to minimize distractions or create a clean look for presentations or recordings, these methods will help you achieve your goal. So give them a try and enjoy a cursor-free Mac experience!

