Have you ever found yourself frustrated with the constant presence of the cursor on your Chromebook screen? Whether you’re trying to focus on reading an article, watching a video, or simply enjoying some downtime, the cursor can often be a distracting element. Fortunately, there is a simple solution to this problem. In this guide, we will explore the step-by-step process of making the cursor disappear on your Chromebook, allowing you to have a more immersive and distraction-free experience.
Imagine a world where you can navigate your Chromebook without the constant visual interruption of a cursor. No more accidentally clicking on the wrong links or getting sidetracked by its movement. By learning how to make the cursor disappear, you can regain control over your browsing experience and truly immerse yourself in the content you’re engaging with. In this comprehensive guide, we will walk you through the necessary steps, ensuring that you can effortlessly hide the cursor whenever you desire. So, whether you’re a student, professional, or anyone seeking a more seamless Chromebook experience, read on to unlock the key to cursor-free browsing.
How to make cursor disappear on Chromebook:
- Open the Chrome browser on your Chromebook.
- Click on the three vertical dots in the top-right corner of the browser window.
- Select “Settings” from the drop-down menu.
- Scroll down and click on “Advanced” at the bottom of the page.
- Under the “Accessibility” section, toggle off the “Show cursor” option.
How to Make Cursor Disappear on Chromebook
In this article, we will guide you on how to make the cursor disappear on your Chromebook. Whether you want a distraction-free browsing experience or need to record your screen without the cursor visible, we have got you covered. Follow the step-by-step instructions below to hide the cursor on your Chromebook.
Method 1: Using Chrome Accessibility Settings
If you want to hide the cursor temporarily while using Chrome on your Chromebook, you can do so by following these simple steps:
Step 1: Click on the clock in the bottom-right corner of the screen to open the system tray. Then, click on the gear icon to open the Settings menu.
Step 2: In the Settings menu, scroll down and click on “Accessibility” to open the accessibility options.
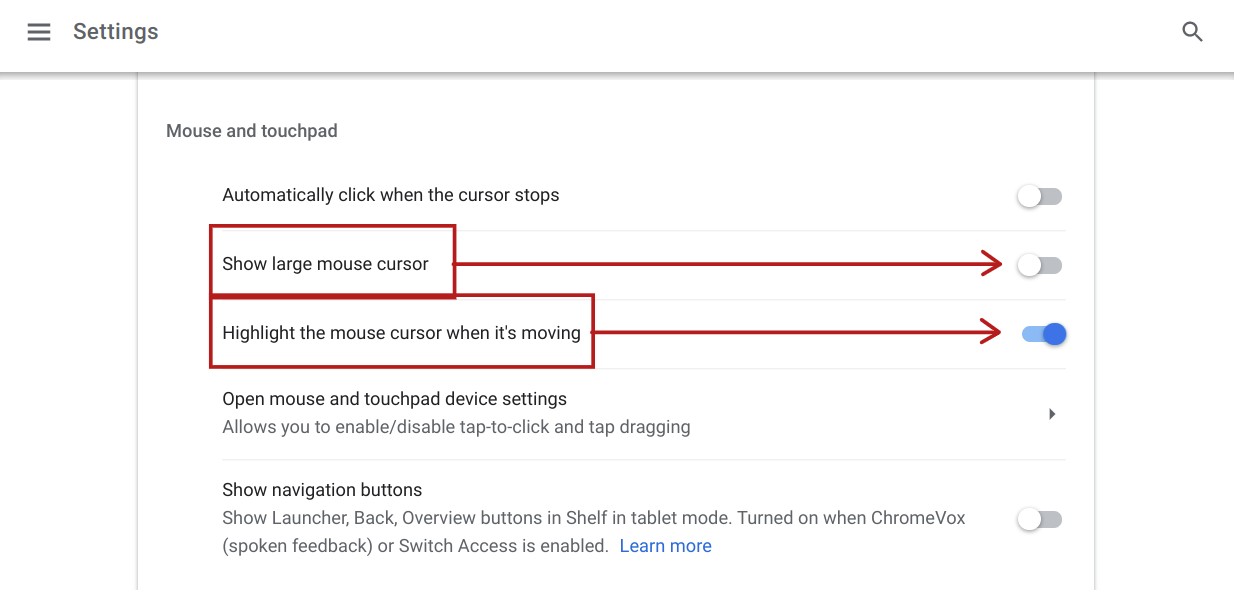
Step 3: Under the “Cursor & pointer” section, toggle the switch next to “Show large mouse cursor” to the off position. This will hide the cursor on your Chromebook while using Chrome.
Step 4: Close the Settings menu. The cursor will now be hidden whenever you use Chrome on your Chromebook. To bring back the cursor, simply move your mouse or touchpad.
Method 2: Using a Chrome Extension
If you want to hide the cursor permanently on your Chromebook, you can use a Chrome extension called “Blank Cursor.” Here’s how:
Step 1: Open the Chrome Web Store by typing “chrome://extensions” in the address bar and pressing Enter.
Step 2: In the Chrome Web Store, search for “Blank Cursor” using the search bar at the top-left corner of the page.
Step 3: Find the “Blank Cursor” extension in the search results and click on “Add to Chrome” to install it.
Step 4: Once the extension is installed, click on the puzzle piece icon in the top-right corner of the browser window, then click on the “Blank Cursor” extension.
Step 5: In the extension settings, toggle the switch next to “Hide cursor” to the on position. This will hide the cursor permanently on your Chromebook.
Step 6: Close the extension settings. The cursor will now be hidden at all times on your Chromebook. To bring back the cursor, you can disable or remove the “Blank Cursor” extension.
By following these methods, you can easily make the cursor disappear on your Chromebook. Whether you prefer a temporary hiding option or a permanent solution using a Chrome extension, now you can enjoy a distraction-free browsing experience or record your screen without the cursor getting in the way. Try out these methods and choose the one that suits your needs best!
Frequently Asked Questions
Here are some frequently asked questions about how to make the cursor disappear on a Chromebook.
Question 1: How can I make the cursor disappear on my Chromebook?
There is no built-in option to make the cursor disappear on a Chromebook. However, you can achieve this by installing a third-party extension called “Custom Cursor for Chrome.” This extension allows you to replace the default cursor with custom images or make it invisible. To use this extension, follow these steps:
1. Open the Chrome Web Store and search for “Custom Cursor for Chrome.”
2. Click on the “Add to Chrome” button to install the extension.
3. Once installed, click on the extension’s icon in the top-right corner of the browser.
4. Select the “No Cursor” option from the list to make the cursor disappear.
Question 2: Can I hide the cursor temporarily without using an extension?
Yes, you can hide the cursor temporarily without using an extension by pressing a keyboard shortcut. Follow these steps:
1. Press the Ctrl + Shift + P keys simultaneously.
2. This will open the Command Palette.
3. Type “Show cursor” in the search bar and select the “Show cursor” option that appears.
4. The cursor will now be hidden until you move the mouse again.
Question 3: Is there a way to adjust the cursor size on a Chromebook?
Yes, you can adjust the cursor size on a Chromebook by changing the accessibility settings. Here’s how:
1. Click on the clock in the bottom-right corner of the screen.
2. Select the gear icon to open the Settings menu.
3. Scroll down and click on “Advanced” to expand the options.
4. Under the “Accessibility” section, click on “Manage accessibility features.”
5. In the “Mouse and touchpad” section, click on “Cursor size.”
6. Adjust the slider to increase or decrease the cursor size according to your preference.
Question 4: Can I change the cursor color on my Chromebook?
Unfortunately, there is no built-in option to change the cursor color on a Chromebook. The cursor color is determined by the operating system and cannot be customized. However, you can consider using a custom cursor extension, like “Custom Cursor for Chrome,” which allows you to change the cursor color and style.
Question 5: How can I reset the cursor settings on my Chromebook?
If you have made any changes to the cursor settings on your Chromebook and want to reset them to the default, follow these steps:
1. Click on the clock in the bottom-right corner of the screen.
2. Select the gear icon to open the Settings menu.
3. Scroll down and click on “Advanced” to expand the options.
4. Under the “Accessibility” section, click on “Manage accessibility features.”
5. In the “Mouse and touchpad” section, click on “Restore settings to their original defaults.”
6. Confirm the reset by clicking “Reset” in the dialog box that appears.
In conclusion, mastering the art of making the cursor disappear on a Chromebook can greatly enhance your browsing experience. By following the simple steps outlined in this guide, you can seamlessly navigate through web pages without the distraction of a visible cursor. Whether you are working on an important project, watching a movie, or simply looking to immerse yourself in the content you are consuming, making the cursor disappear can provide a more immersive and focused environment.
Remember, the key to successfully implementing this feature is to access the accessibility settings on your Chromebook and enable the option to hide the cursor. With just a few clicks, you can transform your browsing experience into a more streamlined and distraction-free one. So why wait? Take control of your Chromebook and enjoy a smoother and more immersive browsing experience by making the cursor disappear.

