Are you a proud owner of an Apple mouse but find yourself struggling with the scrolling functionality? Don’t worry, you’re not alone! Many users initially find it challenging to navigate and scroll using an Apple mouse, especially if they are accustomed to traditional mouse designs. However, fear not, as in this guide, we will walk you through the step-by-step process of how to scroll with an Apple mouse effectively. By the end of this article, you’ll be gliding effortlessly across your screen, scrolling seamlessly through webpages and documents, and making the most out of your Apple mouse’s unique features.
The Apple mouse is renowned for its sleek design and innovative touch-sensitive surface. It deviates from the conventional scroll wheel found on most mice, which can be initially perplexing for new users. Whether you’re a Mac enthusiast or a recent convert, understanding how to navigate and scroll with an Apple mouse is essential to maximize your productivity and overall user experience. So, let’s dive in and unravel the mystery behind scrolling with an Apple mouse, empowering you to navigate your digital world with ease and finesse.
How to Scroll with Apple Mouse:
- Make sure your Apple Mouse is connected to your Mac via Bluetooth.
- Open System Preferences from the Apple menu.
- Click on “Mouse” to open the Mouse preferences.
- Adjust the scrolling speed by moving the “Scrolling speed” slider.
- Choose your preferred scrolling direction by selecting “Natural” or “Traditional”.
- Test the scrolling by using the scroll wheel or the touch surface of your Apple Mouse.
How to Scroll with an Apple Mouse
In this article, we will guide you through the steps to scroll with an Apple mouse. Apple mice are known for their sleek design and advanced features, and scrolling is no exception. Whether you are using a Magic Mouse or a Magic Trackpad, the scrolling experience is smooth and intuitive. Follow the steps below to make the most out of your Apple mouse and enhance your scrolling experience.
Step 1: Enable Scrolling
The first step to scroll with an Apple mouse is to ensure that scrolling is enabled on your device. To do this, go to the Apple menu in the top-left corner of your screen and select “System Preferences.” From the System Preferences window, click on “Mouse” or “Trackpad,” depending on the device you are using.
Once you are in the Mouse or Trackpad settings, navigate to the “Scroll & Zoom” tab. Here, you will find options to adjust the scrolling behavior. Make sure that the “Scroll direction: Natural” checkbox is unchecked. This will enable scrolling in the traditional way, where moving your finger or mouse downwards will scroll down, and moving it upwards will scroll up.
Step 2: Use One or Two Fingers
Apple mice are designed to support both one-finger and two-finger scrolling gestures. Depending on your preference, you can choose the method that suits you best.
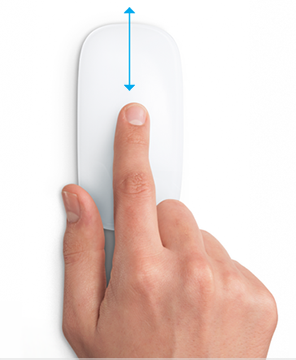
If you prefer one-finger scrolling, simply move your finger up or down on the mouse’s surface. The content on your screen will scroll accordingly, allowing you to navigate through documents, websites, or other scrolling-enabled applications with ease.
If you prefer two-finger scrolling, place two fingers on the mouse’s surface and move them up or down simultaneously. This gesture provides a more precise scrolling experience and is especially useful when working with detailed or lengthy documents.
Step 3: Customize Scrolling Speed
If you find that the scrolling speed is not to your liking, you can easily adjust it to suit your needs. To do this, go to the Mouse or Trackpad settings in the System Preferences, as mentioned in Step 1.
Once you are in the Scroll & Zoom tab, you will find a slider labeled “Scrolling speed” or similar. Move the slider to the left to decrease the scrolling speed, or to the right to increase it. Test the scrolling speed by scrolling through a document or a webpage to ensure it feels comfortable and responsive.
Step 4: Additional Scrolling Options
Apple mice offer additional scrolling options that can enhance your productivity and scrolling experience. To access these options, go back to the Mouse or Trackpad settings in the System Preferences.
For example, you can enable “Smart zoom” to quickly zoom in on a webpage or document by double-tapping with one finger. You can also enable “Scroll direction: Natural” to reverse the scrolling behavior, where moving your finger or mouse upwards will scroll down, and moving it downwards will scroll up. Experiment with these options to find the settings that work best for you.
Step 5: Practice and Explore
Now that you know the basics of scrolling with an Apple mouse, it’s time to practice and explore the various scrolling techniques and gestures. The more you use your Apple mouse, the more comfortable you will become with scrolling and navigating through different applications and content.
Remember to keep your mouse clean and free from dust or debris, as this can affect the scrolling performance. Regularly clean the mouse’s surface and the sensor underneath to ensure smooth and accurate scrolling.
Step 6: Troubleshooting
If you encounter any issues with scrolling on your Apple mouse, there are a few troubleshooting steps you can try. First, make sure that the mouse is properly connected to your computer via Bluetooth or USB. If it is a wireless mouse, check the battery level and replace the batteries if necessary.
If the scrolling is still not working, you can try resetting the mouse’s settings by going to the Mouse or Trackpad settings in the System Preferences and clicking on the “Reset” or “Restore Defaults” button. This will revert the scrolling settings back to their original configuration.
Step 7: Advanced Scrolling Techniques
Once you have mastered the basics of scrolling with an Apple mouse, you can explore advanced scrolling techniques to further enhance your productivity. For example, you can use multi-touch gestures to swipe between different desktops or to activate Mission Control for a bird’s-eye view of your open windows.
Refer to Apple’s official documentation or online resources for more information on these advanced scrolling techniques and how to customize them to suit your workflow.
Frequently Asked Questions
In this section, you will find answers to common questions about how to scroll with an Apple mouse.
Question 1: How do I scroll with an Apple mouse?
To scroll with an Apple mouse, simply place your finger on the scroll surface located on the top of the mouse and move it up or down. This will allow you to scroll through documents, webpages, and other content on your computer. The scrolling direction can be adjusted in the System Preferences under the Mouse settings.
If you are using a Magic Mouse, you can also enable the “swipe between pages” feature, which allows you to scroll horizontally by swiping left or right with one finger on the mouse surface.
Question 2: Why is scrolling not working on my Apple mouse?
If scrolling is not working on your Apple mouse, there are a few things you can try to troubleshoot the issue. First, make sure that your mouse is connected to your computer properly. Check the battery level of your mouse and replace the batteries if necessary.
If you are using a Magic Mouse, check if the scrolling feature is enabled in the System Preferences. Additionally, try cleaning the scroll surface of your mouse with a soft cloth to remove any dirt or debris that may be interfering with the scrolling functionality.
Question 3: Can I adjust the scrolling speed on my Apple mouse?
Yes, you can adjust the scrolling speed on your Apple mouse. To do this, go to the System Preferences on your computer and select the Mouse settings. Under the “Scrolling” tab, you will find options to adjust the scrolling speed. Move the slider to the left or right to decrease or increase the scrolling speed according to your preference.
Keep in mind that the scrolling speed may vary depending on the application you are using. Some applications may have their own scrolling settings that override the system settings.
Question 4: How can I reverse the scrolling direction on my Apple mouse?
To reverse the scrolling direction on your Apple mouse, go to the System Preferences on your computer and select the Mouse settings. Under the “Scrolling” tab, you will find a checkbox labeled “Scroll direction: natural”. Uncheck this box to reverse the scrolling direction.
By default, Apple uses a scrolling direction where content moves in the same direction as your fingers on the scroll surface. Unchecking the “natural” scrolling option will make the content move in the opposite direction, similar to traditional scrolling.
Question 5: Can I customize the scrolling behavior on my Apple mouse?
Yes, you can customize the scrolling behavior on your Apple mouse. In the Mouse settings in the System Preferences, you will find options to customize the scrolling behavior. You can choose to enable or disable features like “swipe between pages” on a Magic Mouse or adjust the scroll speed.
Furthermore, some applications may have specific scrolling options that you can customize within the app settings. It is recommended to explore the settings of individual applications to see if there are any additional scrolling customization options available.
In conclusion, mastering the art of scrolling with an Apple mouse is a skill that can greatly enhance your productivity and overall user experience. By understanding the various scrolling options available and customizing them to suit your preferences, you can navigate through documents, web pages, and applications with ease. Whether you prefer the traditional scroll method or the innovative touch-based scrolling, the Apple mouse offers a seamless and intuitive scrolling experience that allows you to effortlessly navigate through your digital world.
Furthermore, by taking advantage of the additional features and gestures offered by the Apple mouse, such as horizontal scrolling and customizable button assignments, you can further streamline your workflow and make your computer usage more efficient. With a little practice and experimentation, you will soon find yourself effortlessly scrolling through content, zooming in and out, and accessing various functions with just a few simple gestures. So, embrace the power of your Apple mouse, and unlock the full potential of your digital interactions. With this newfound knowledge, you can take your scrolling skills to the next level and enjoy a smoother and more enjoyable user experience on your Mac or MacBook.

